
pwnedlabs
这篇文章是我边做pwnedlabs这个靶场边学习aws云安全的一个记录
Identify the AWS Account ID from a Public S3 Bucket
Scenario
The ability to expose and leverage even the smallest oversights is a coveted skill. A global Logistics Company has reached out to our cybersecurity company for assistance and have provided the IP address of their website. Your objective? Start the engagement and use this IP address to identify their AWS account ID via a public S3 bucket so we can commence the process of enumeration.
靶机开启之后给了一个ip地址和AK/SK
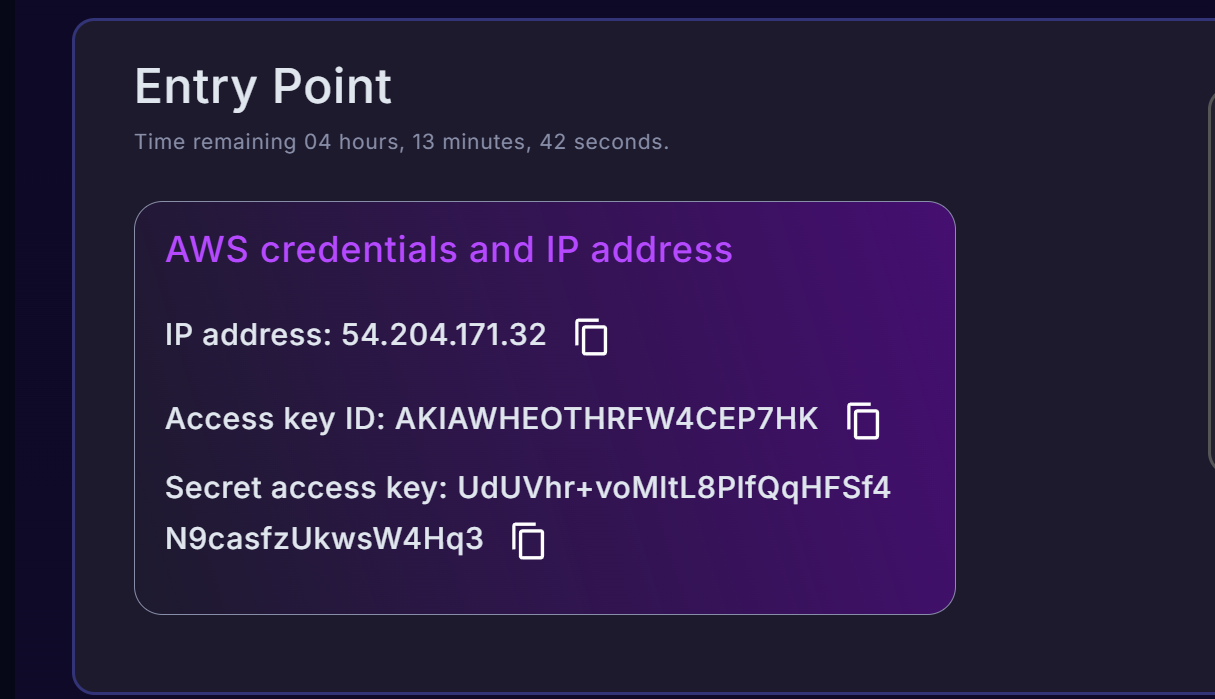
这个AK/SK我没有找到有什么用处
最开始我刚开启靶机,试着ping这个ip地址来测试一下网络的连通性
结果就是死活ping不通
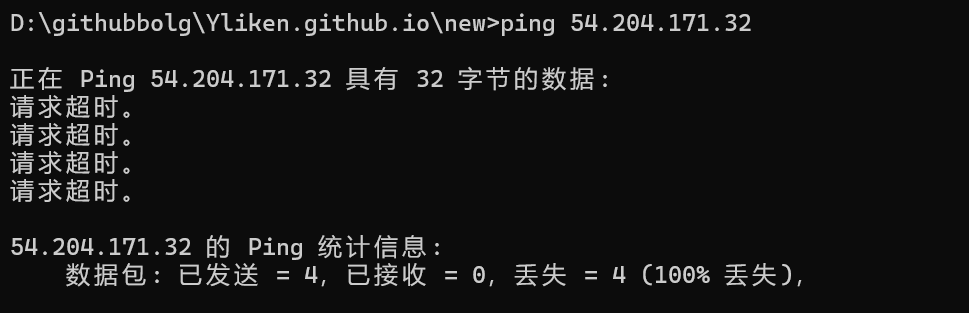
一次无意的curl 发现curl可以访问
这才意识到它可能ban掉了ping协议
nmap探测一手端口
1 | ┌──(root㉿LAPTOP-40PQI58C)-[~/Desktop/cicd/cicd-goat/reports/caterpillar] |
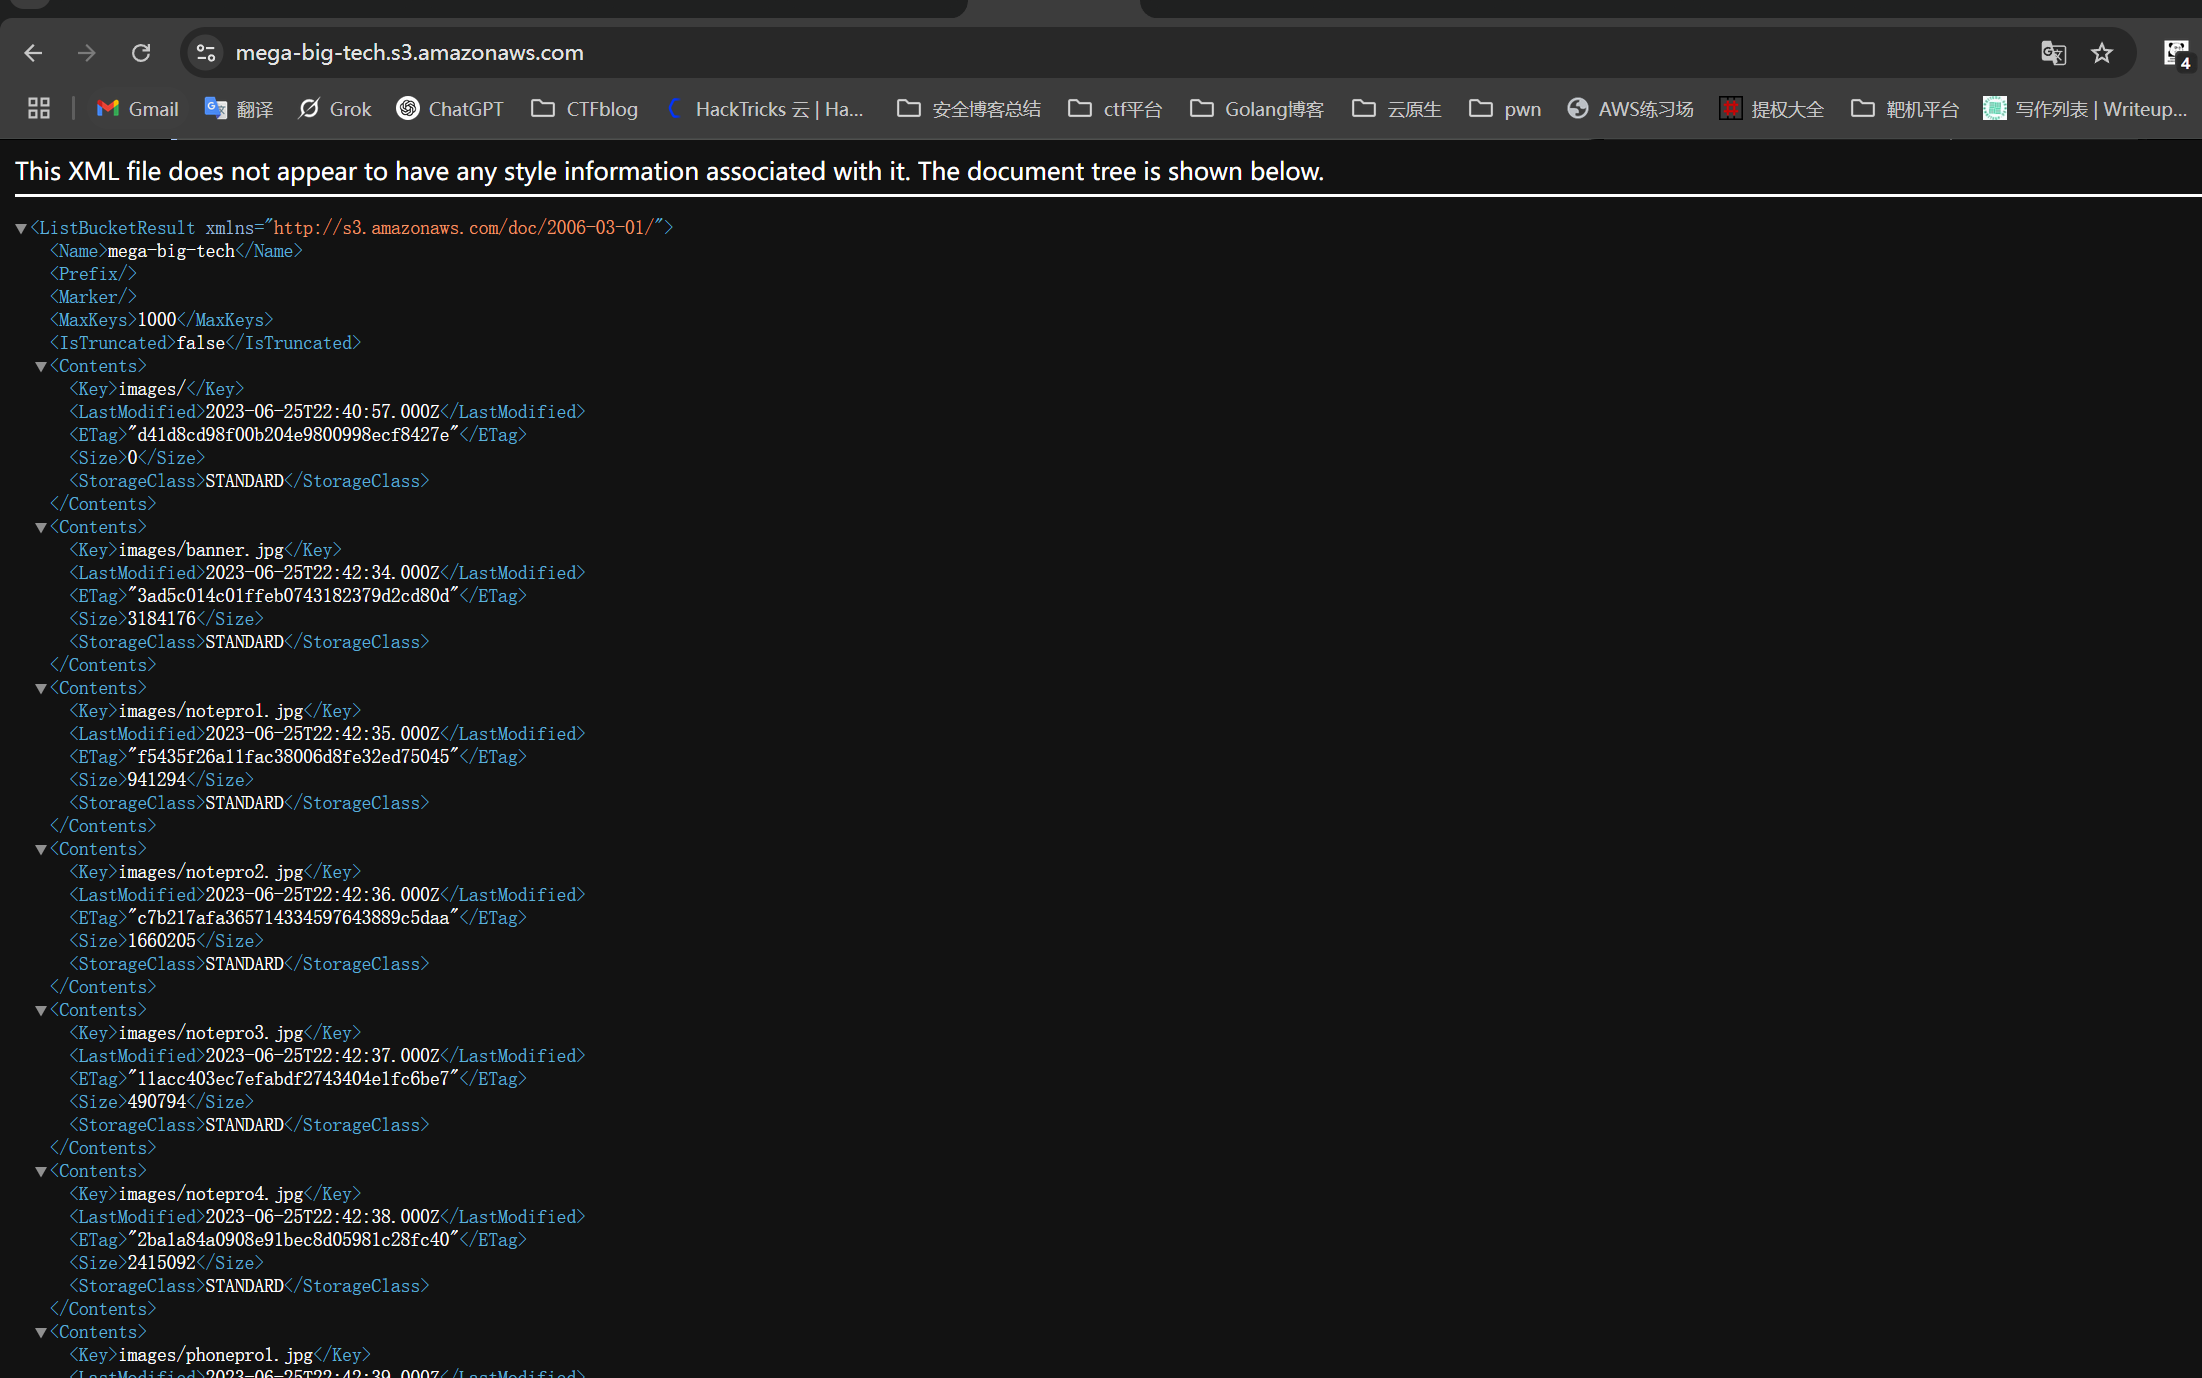
80端口只是一个静态网站
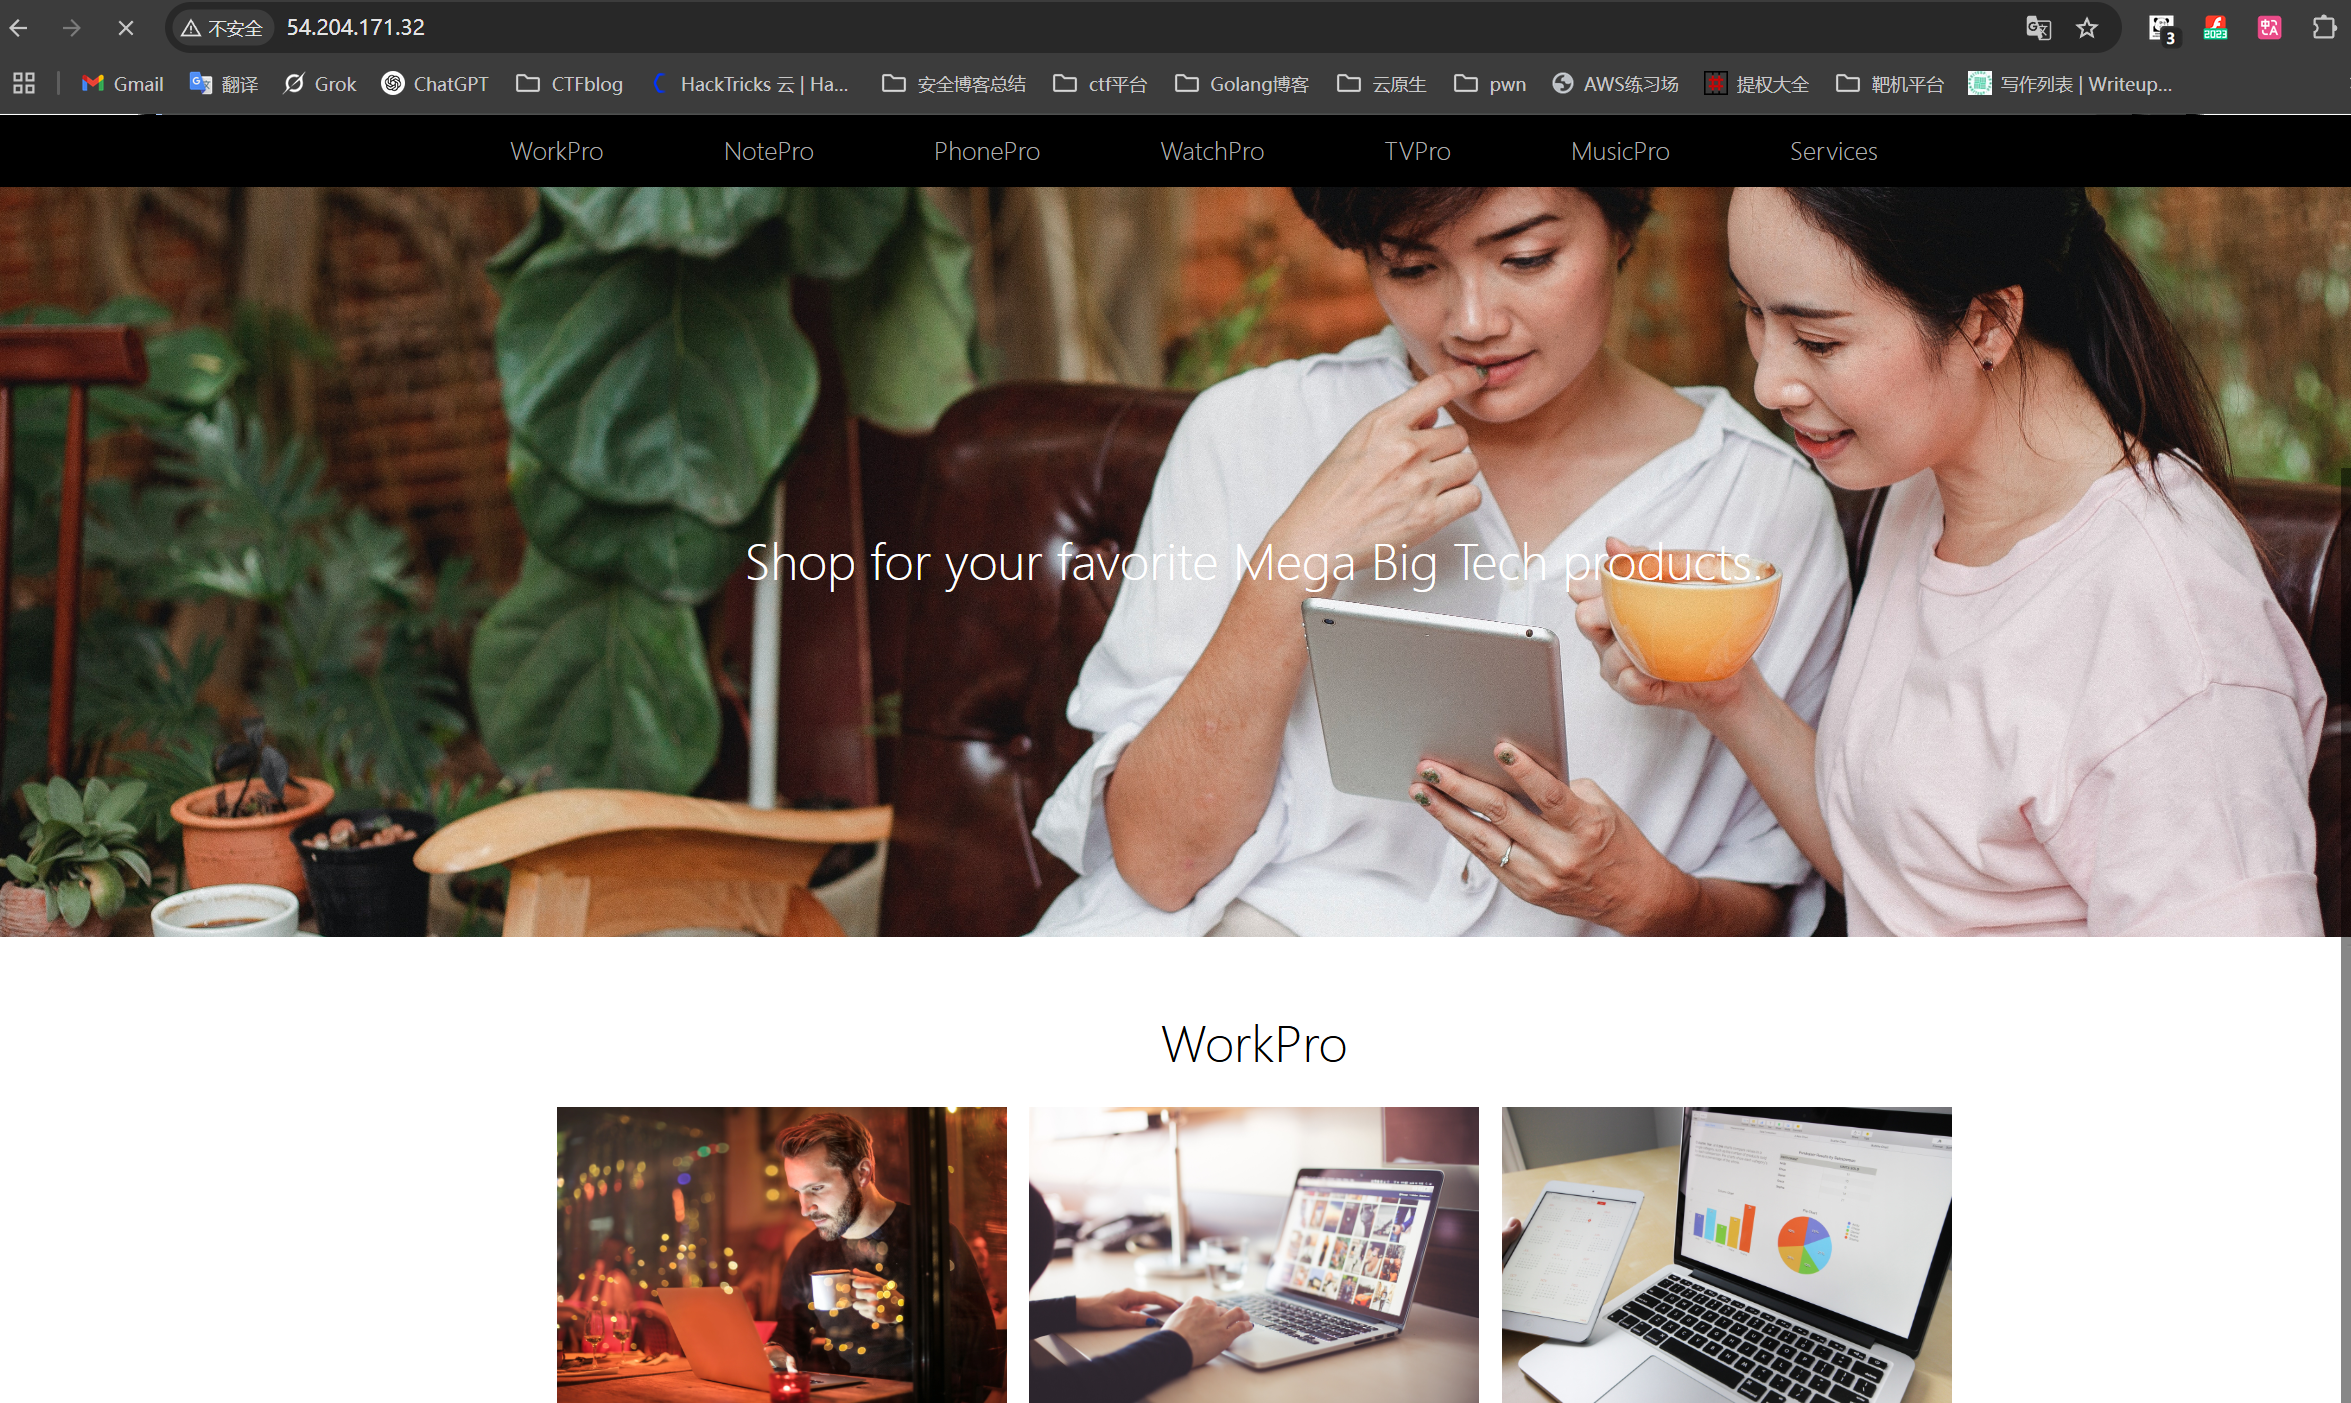
不过网站的图片是从存储桶上面加载的
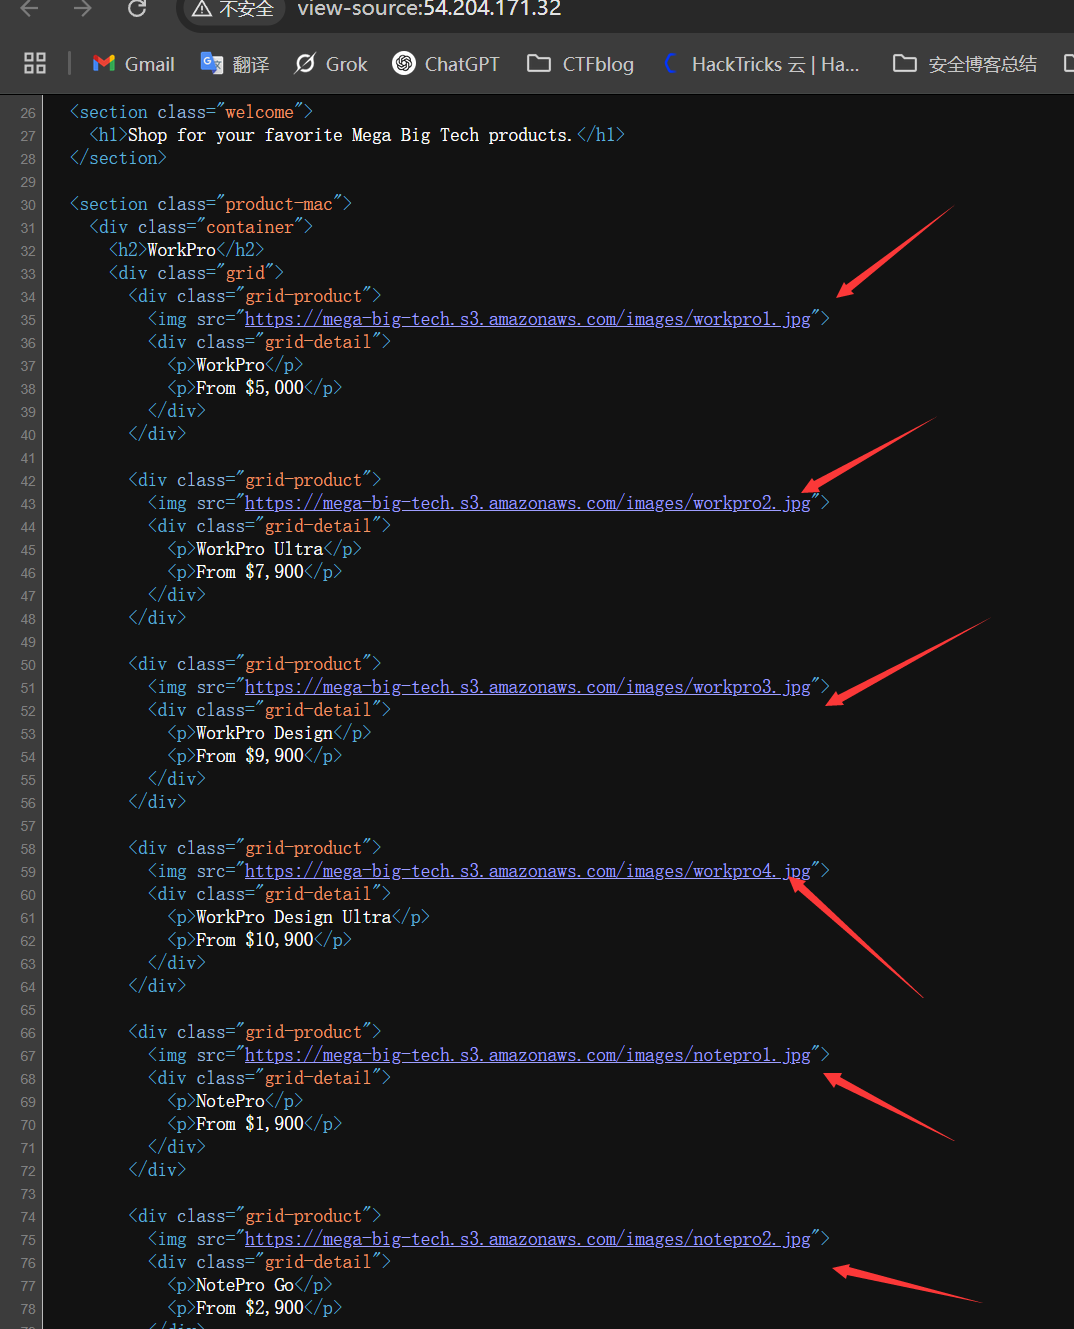
aws s3存储桶的命名规则是 <桶的名称>.s3.amazonaws.com
所以这个存储桶的名称就是mega-big-tech
在浏览器上面访问这个存储桶,你会发现除了几张图片并没有什么东西
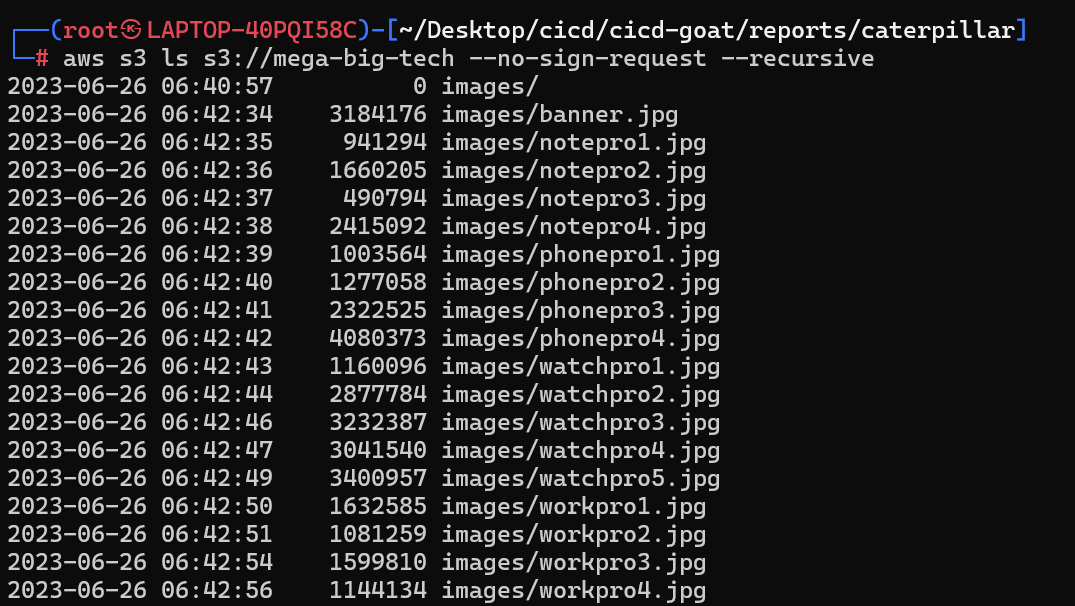
同时你也可以使用aws cli 来访问这个s3存储桶
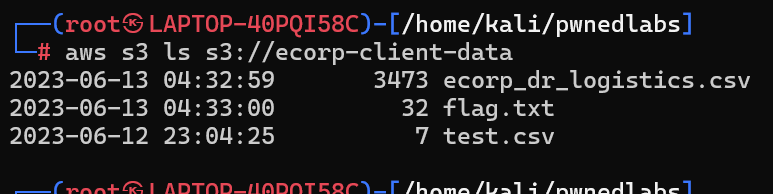
使用aws s3 ls s3://mega-big-tech --no-sign-request --recursive来匿名访问存储桶 并且递归显示出桶中的内容
不过这个靶场只是让我们获取与这个s3存储桶关联的AWS账户的id
这里可以用**s3-account-search**这个工具来进行ID枚举
你可以在这里了解到这个工具的原理Finding the Account ID of any public S3 bucket
使用这个工具进行爆破的时候需要一个对目标桶具有s3:GetObject或者s3:ListBucket权限的角色的arn
如果你没有aws账户,你可以使用pwnedlabs提供的一个arn进行枚举arn:aws:iam::427648302155:role/LeakyBucket
如果您有一个aws账户,你也可以自己配置一个角色来进行枚举
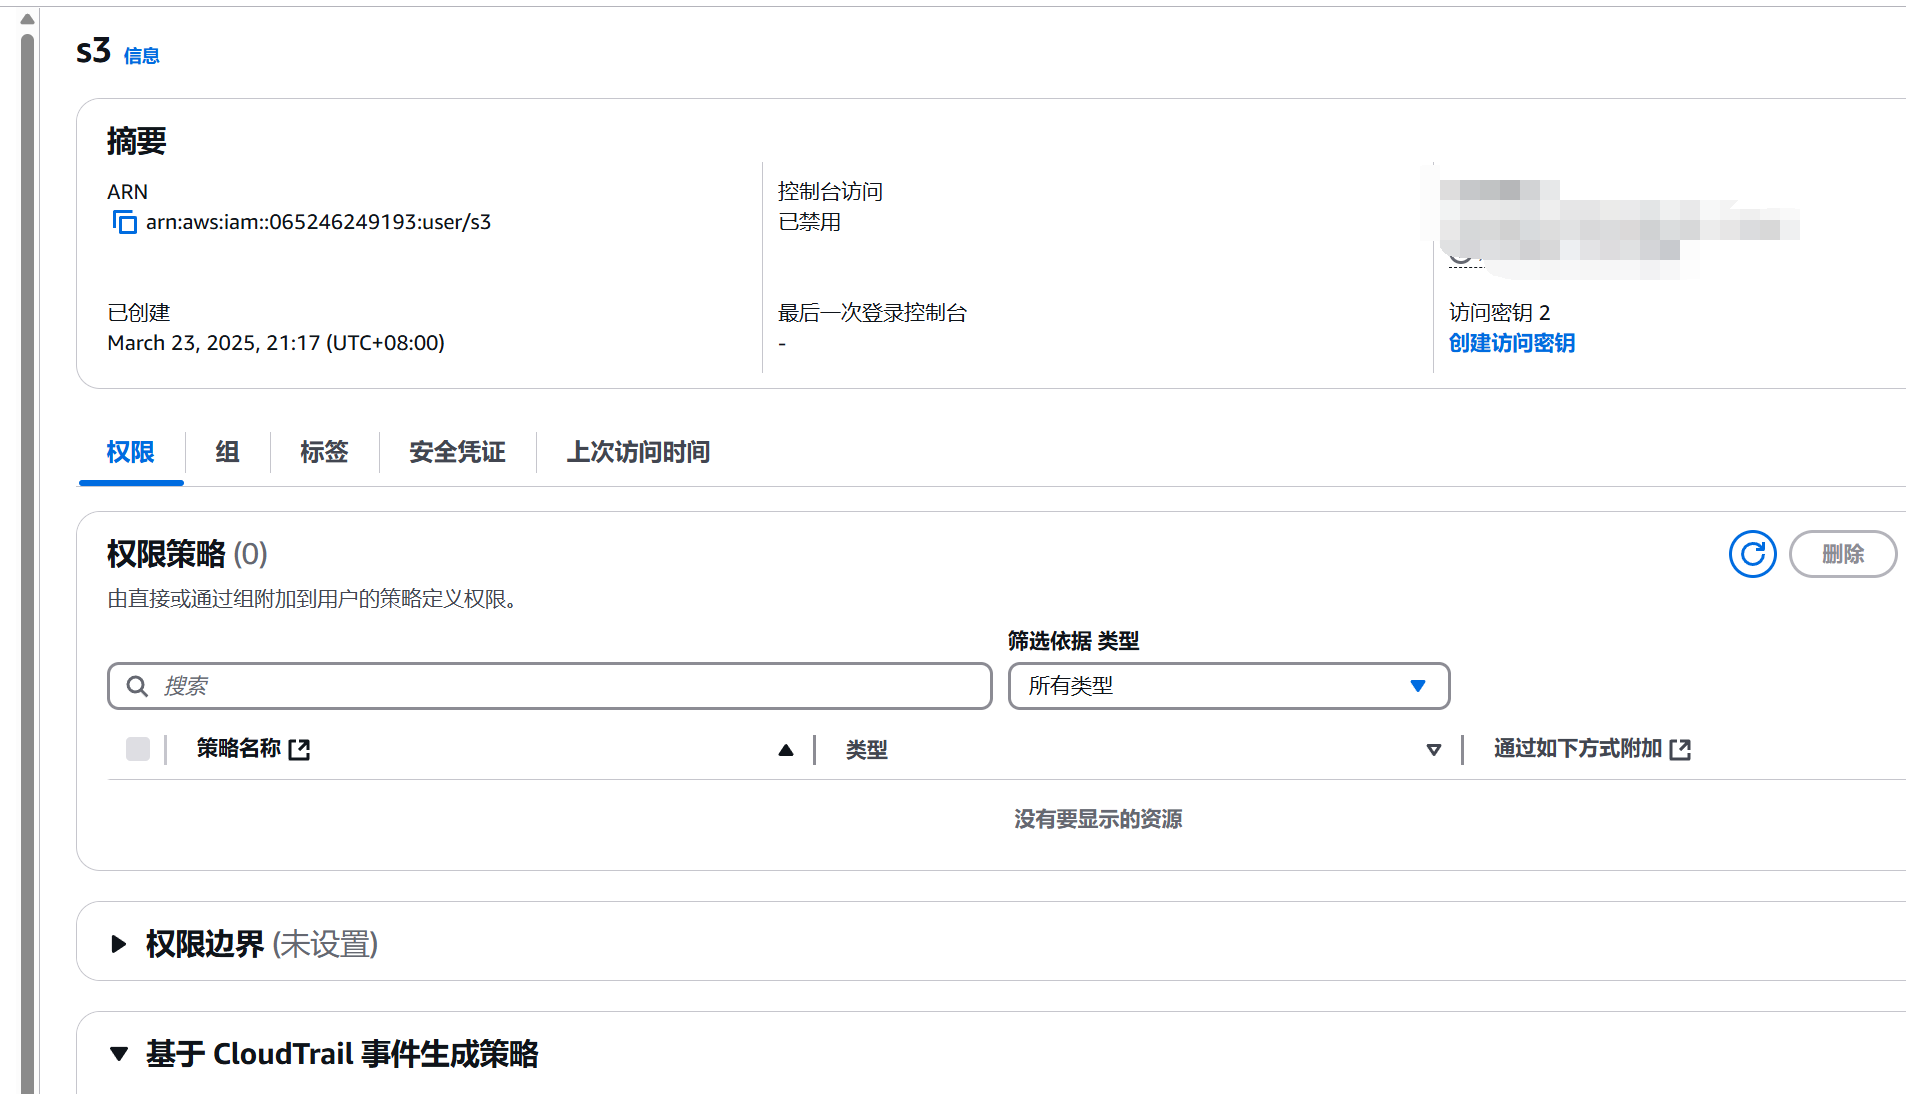
首先你需要创建一个用户
然后在策略里面新建两条策略
承担该角色的 IAM 用户将附加以下策略
1 | { |
您的用户被允许承担的角色将附加以下策略,该策略允许s3:GetObject和s3:ListBucket访问存储桶的权限mega-big-tech
1 | { |
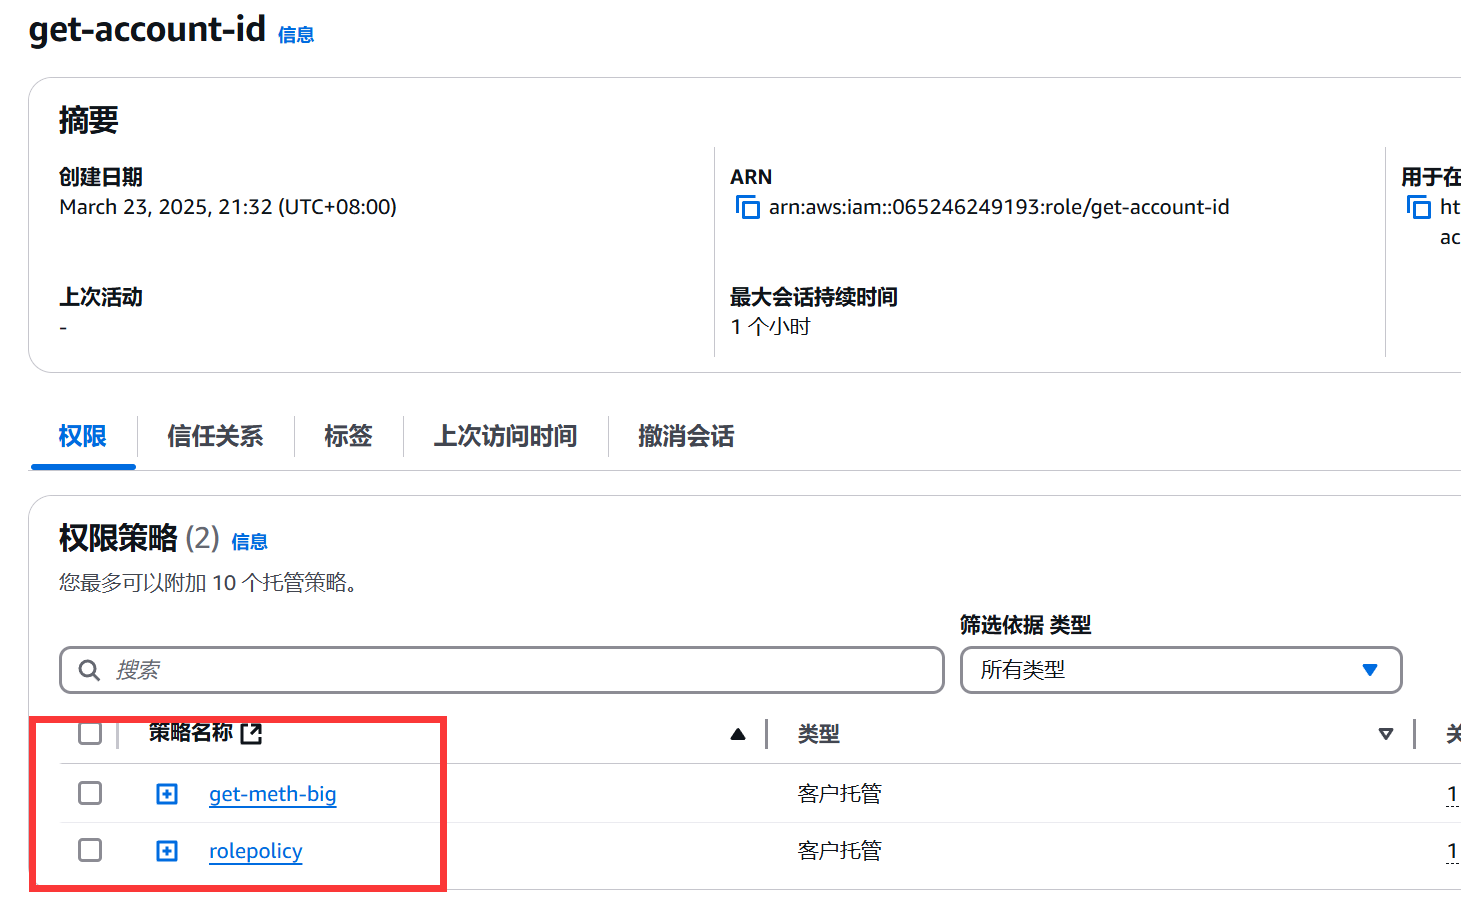
然后创建一个角色,将这两条测试附加上去,我这里分别是rolepolicy与get-meth-big
随后你需要添加信任关系
1 | { |
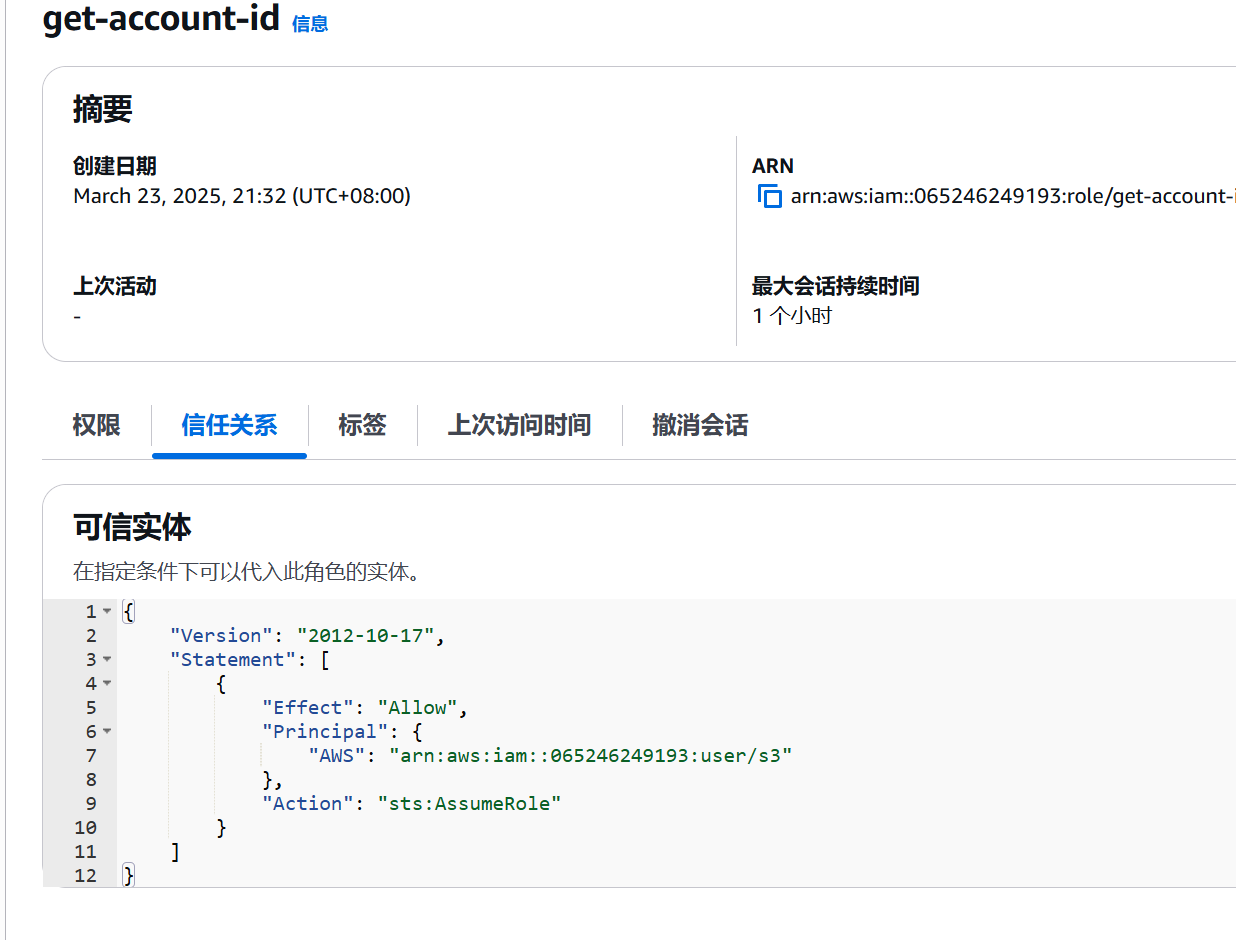
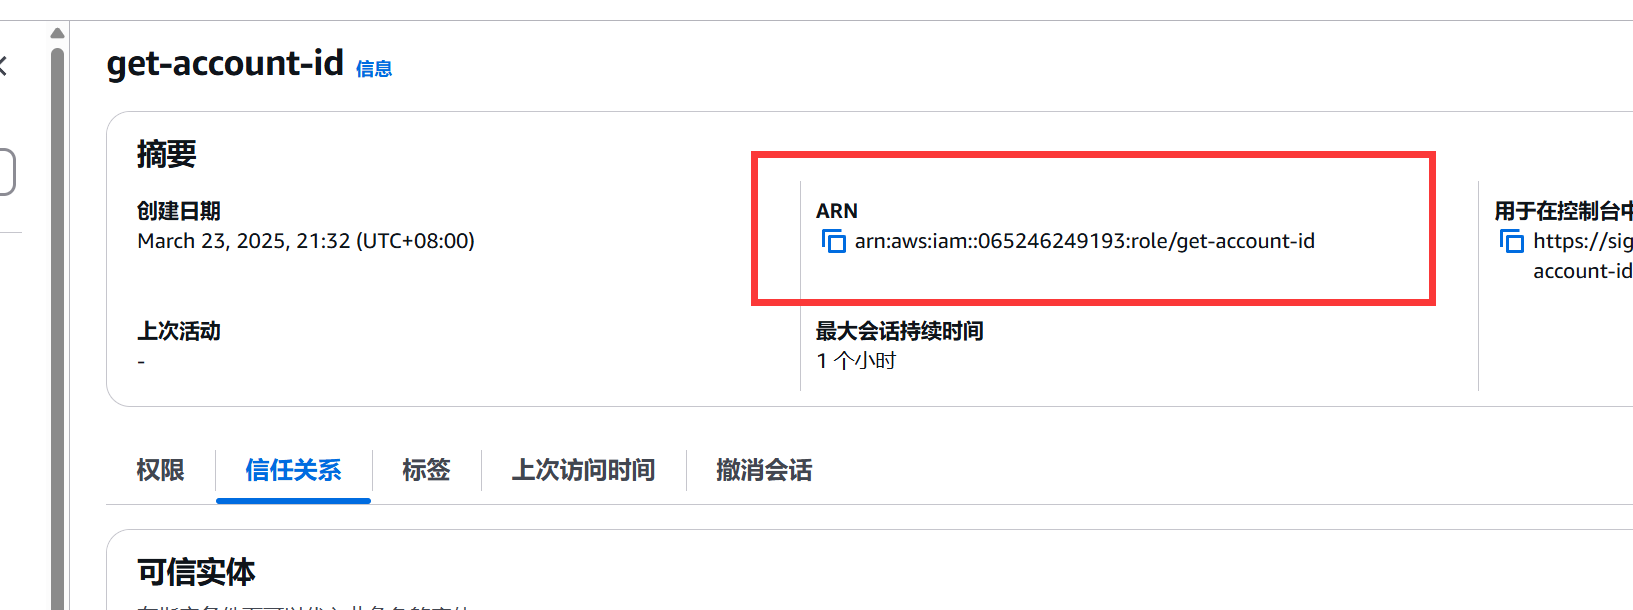
然后就可以使用这个角色的arn进行ID枚举了
等他完全爆破出来就行了

但是AWS Account ID并不是敏感信息
那么拿到这个信息有什么用呢?
接下来,来看下面这个靶场
Loot Public EBS Snapshots
Scenario
Huge Logistics, a titan in their industry, has invited you to simulate an “assume breach” scenario. They’re handing you the keys to their kingdom - albeit, the basic AWS credentials of a fresh intern. Your mission, should you choose to accept it, is to navigate their intricate cloud maze, starting from this humble entry. Gain situational awareness, identify weak spots, and test the waters to see how far you can elevate your access. Can you navigate this digital labyrinth and prove that even the smallest breach can pose significant threats? The challenge is set. The game is on.
靶机只给了一个AK/SK
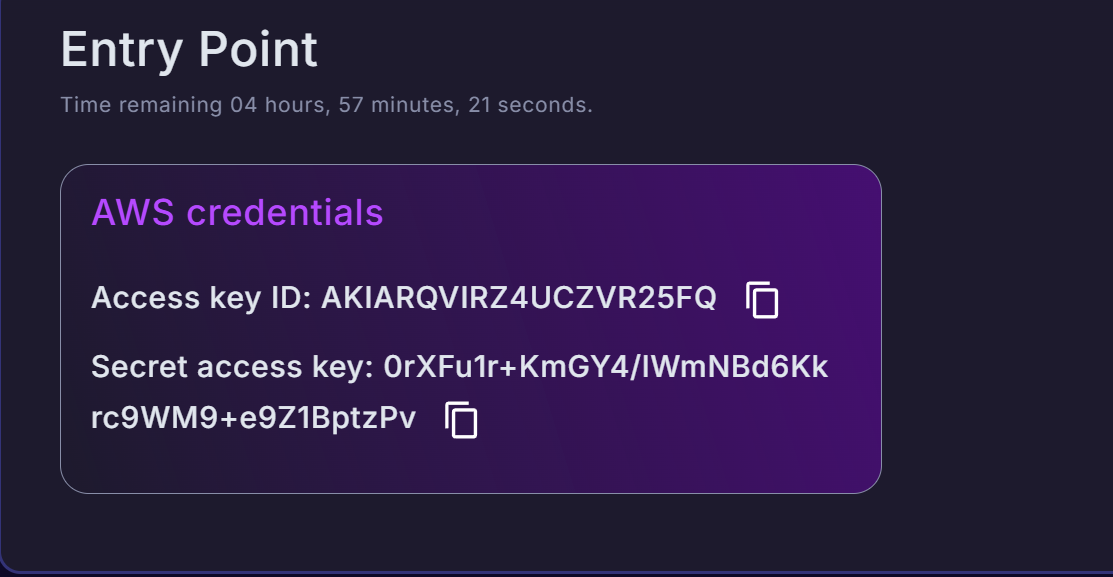
配置到aws cli中
1 | ┌──(root㉿LAPTOP-40PQI58C)-[~/Desktop/cicd/cicd-goat/reports/caterpillar] |
执行aws sts get-caller-identity来查看当前用户信息。类似于linux中的whoami
1 | ┌──(root㉿LAPTOP-40PQI58C)-[~/Desktop/cicd/cicd-goat/reports/caterpillar] |
执行aws iam list-attached-user-policies --user-name intern来列出与intern关联的iam策略
1 | ┌──(root㉿LAPTOP-40PQI58C)-[~/Desktop/cicd/cicd-goat/reports/caterpillar] |
查看该策略aws iam get-policy --policy-arn arn:aws:iam::104506445608:policy/PublicSnapper
1 | ┌──(root㉿LAPTOP-40PQI58C)-[~/Desktop/cicd/cicd-goat/reports/caterpillar] |
当前生效的策略版本是v9
PolicyName: PublicSnapper - 策略的名称。
PolicyId: ANPARQVIRZ4UD6B2PNSLD - 策略的唯一标识符。
Arn: arn:aws:iam::104506445608:policy/PublicSnapper - 策略的 ARN。
Path: / - 策略的路径(默认路径)。
DefaultVersionId: v9 - 当前生效的策略版本是 v9,说明这个策略可能被更新过多次(从 v1 到 v9)。
AttachmentCount: 1 - 该策略当前附加到了 1 个实体(这里是用户 intern)。
PermissionsBoundaryUsageCount: 0 - 没有使用权限边界。
IsAttachable: true - 表示这是一个托管策略,可以附加到用户、组或角色。
CreateDate: 2023-06-10T22:33:41+00:00 - 策略创建时间(2023年6月10日)。
UpdateDate: 2024-01-15T23:47:11+00:00 - 最后一次更新时间(2024年1月15日)。
Tags: [] - 没有附加标签。
查看策略的具体内容aws iam get-policy-version --policy-arn arn:aws:iam::104506445608:policy/PublicSnapper --version-id v9
1 | ┌──(root㉿LAPTOP-40PQI58C)-[~/Desktop/cicd/cicd-goat/reports/caterpillar] |
拥有ec2:DescribeSnapshotAttribute与ec2:DescribeSnapshots这两个权限。这个两个权限都可以查看快照信息,不过第一个是针对于特定快照的,并且可以查看具体信息。第二个是针对所有快照的,只能查看基本信息。
列出当前用户拥有的快照aws ec2 describe-snapshots --owner-ids self --region us-east-1
1 | ┌──(root㉿LAPTOP-40PQI58C)-[~/Desktop/cicd/cicd-goat/reports/caterpillar] |
查看快照的createVolumePermission属性
createVolumePermission这个属性决定了谁可以用这个快照来创建EBS卷
EBS(Elastic Block Store) 是 AWS 提供的持久性块存储服务,用于给 EC2 实例提供存储。简单来说,EBS 卷就像是一块云端的硬盘,可以挂载到 EC2 服务器上,并在服务器关机后仍然保留数据。
1 | ┌──(root㉿LAPTOP-40PQI58C)-[~/Desktop/cicd/cicd-goat/reports/caterpillar] |
{"Group":"all"}表明所有用户都可以用这个夸张进行创建EBS卷
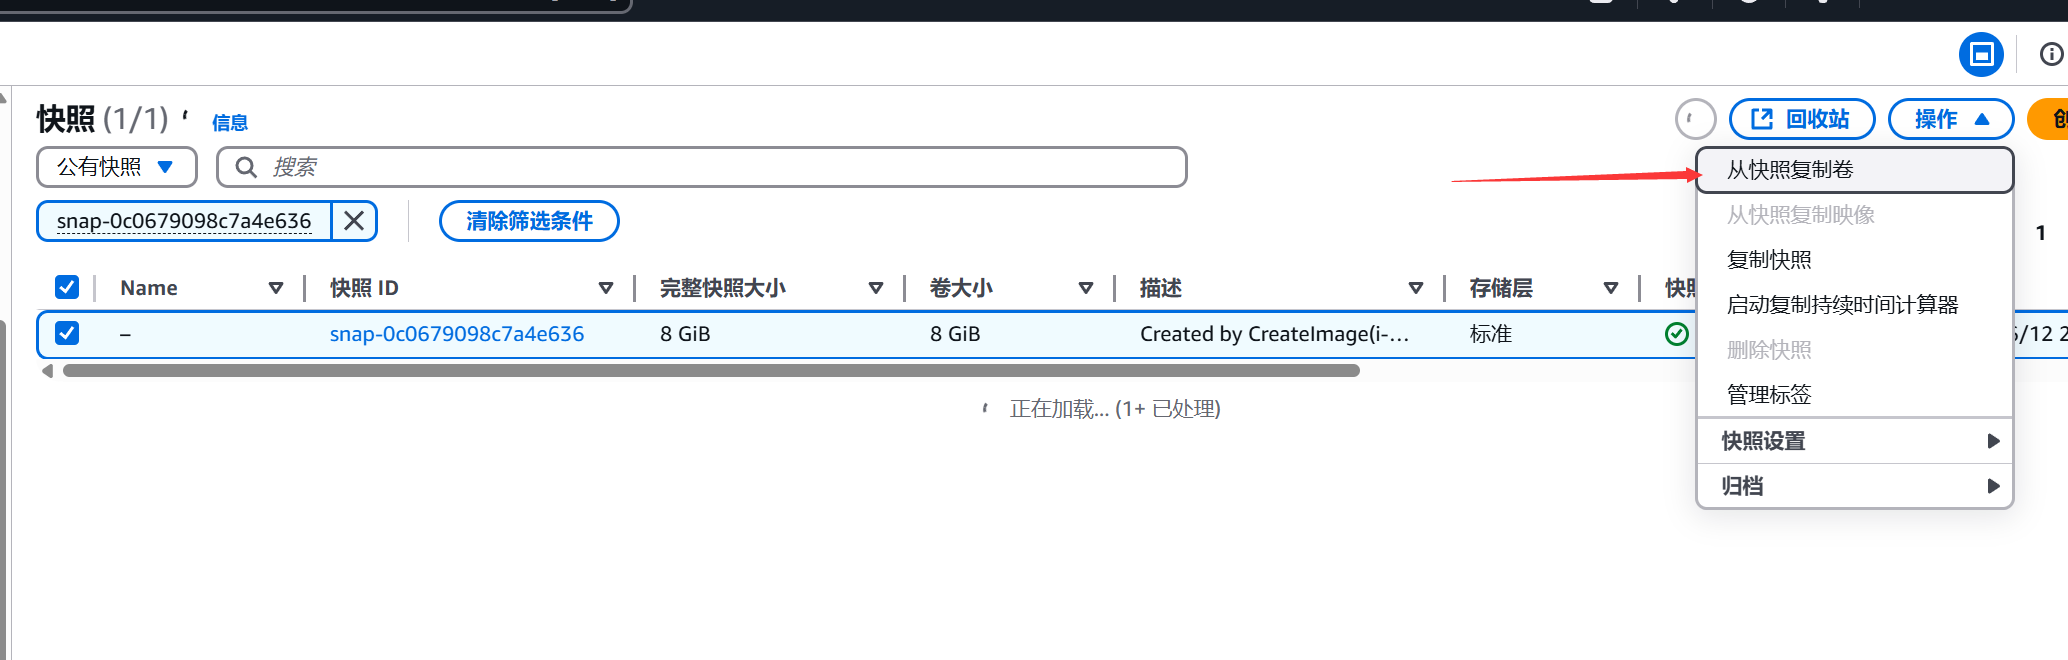
然后我们就可以在aws控制台 进入ec2板块->快照 搜索快照
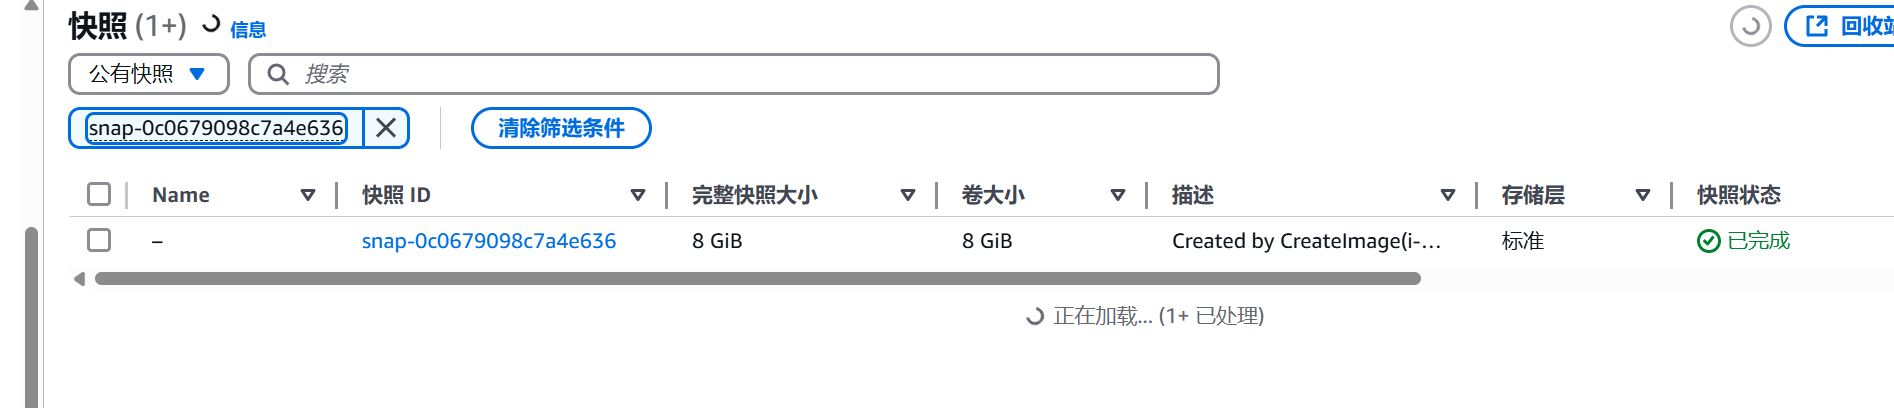
从快照复制卷
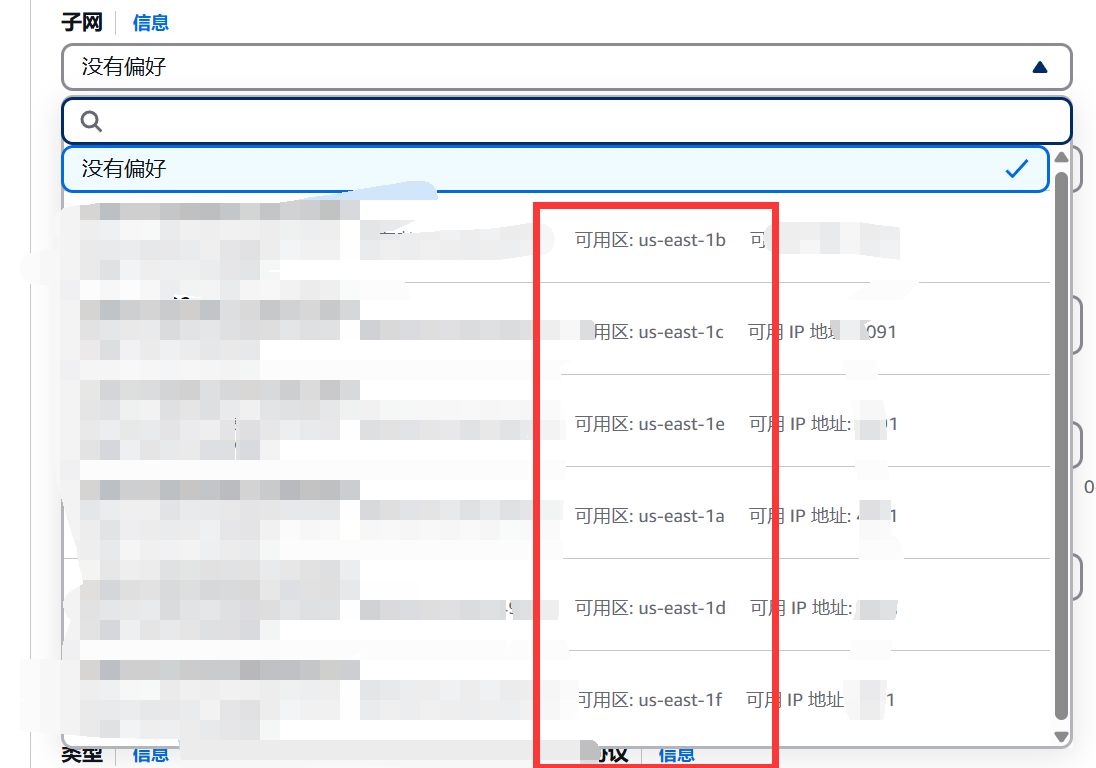
创建好的卷需要记住这个可用区

然后创建一个实例镜像啥的选免费套餐就行
记得创建一个密钥对
这里的可用区一定要和卷的可用区一样
其他的默认,创建实例
不能直接远程登录root
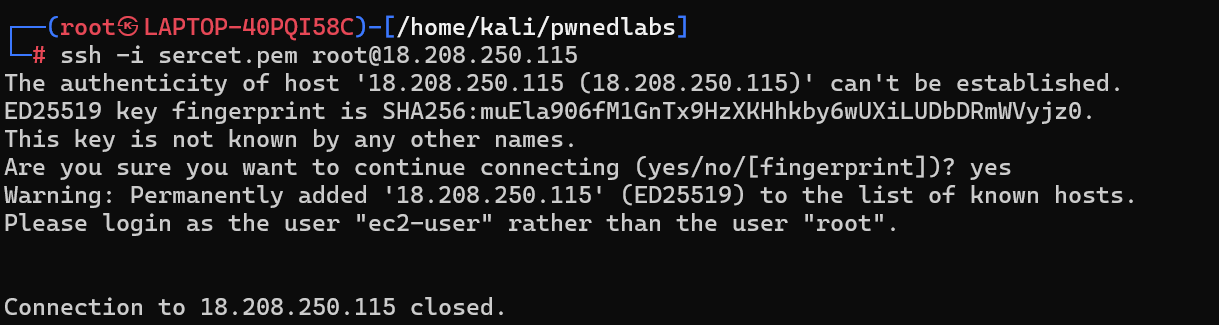
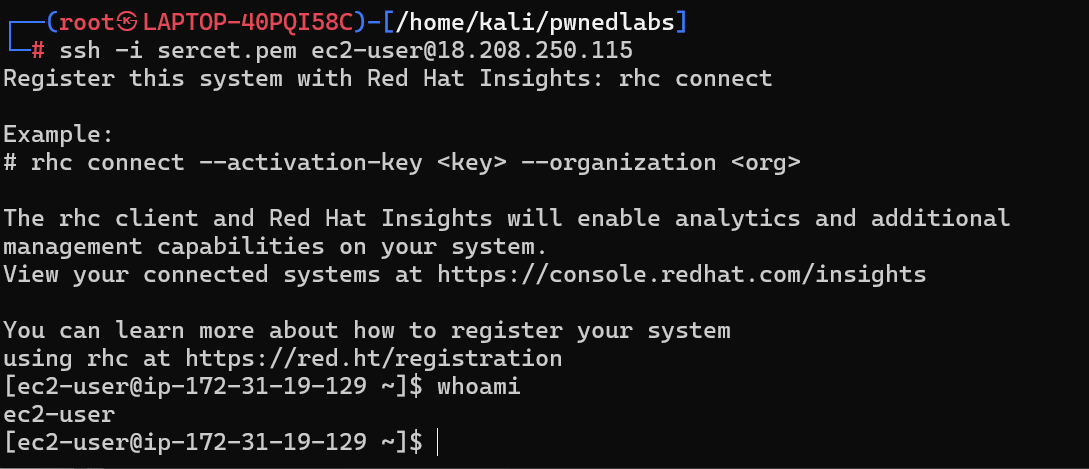
使用他要求的ec2-user就行了
然后把刚才的卷挂载到服务器上面
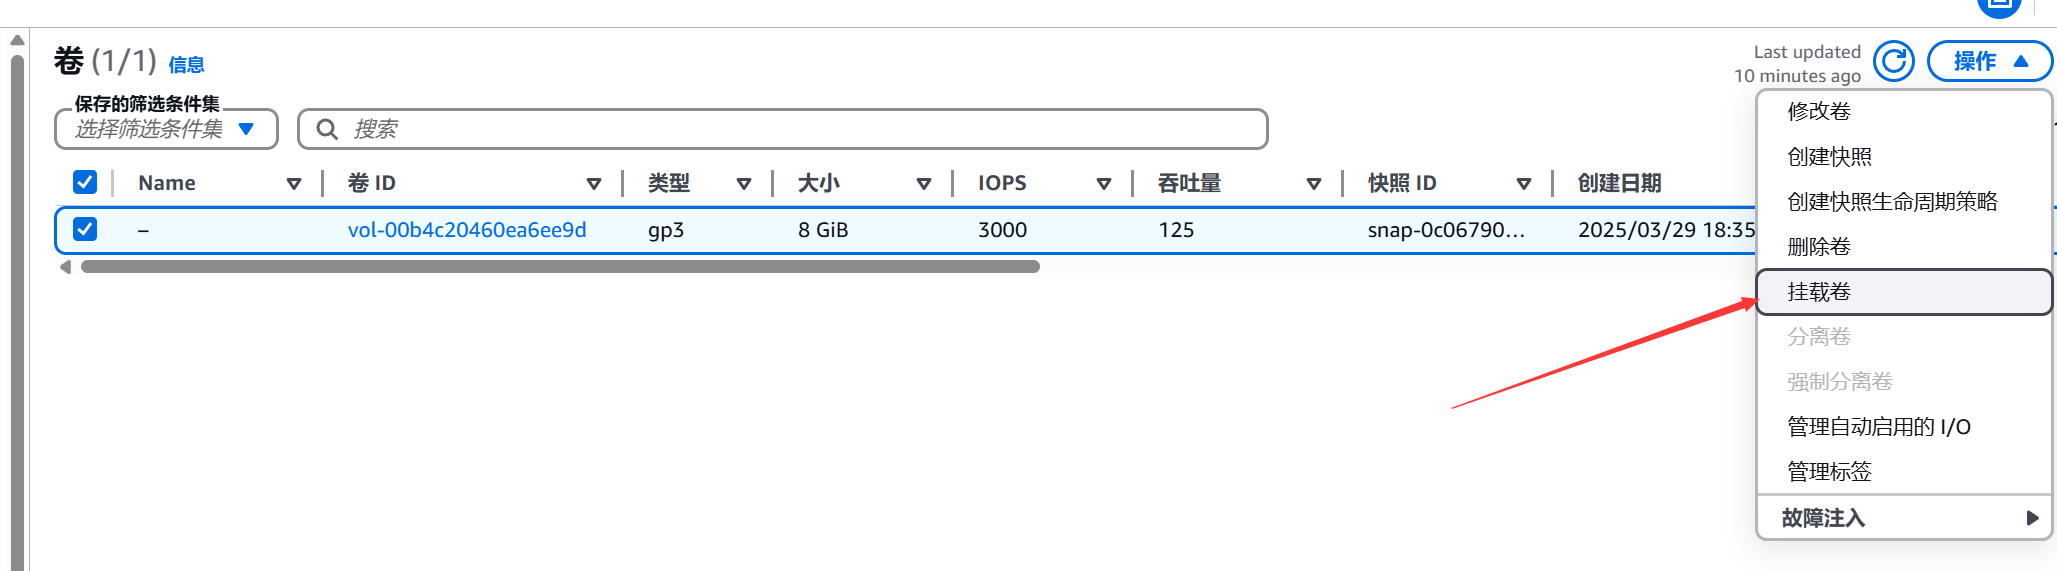
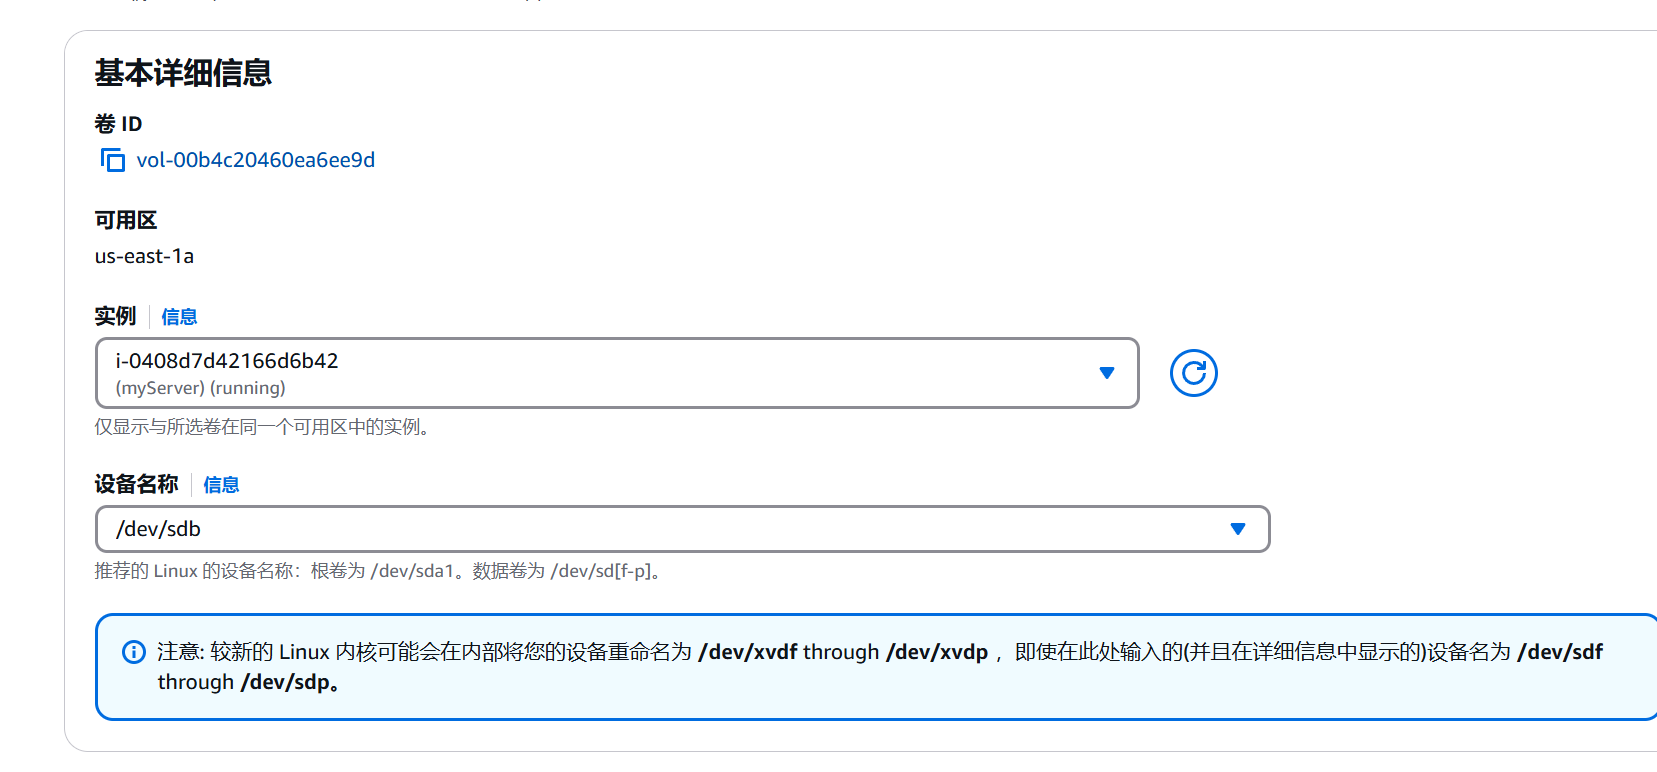
列出所有块设备
将xvdb挂载一下 mount /dev/xvdb1 /root/pwnedlabs/

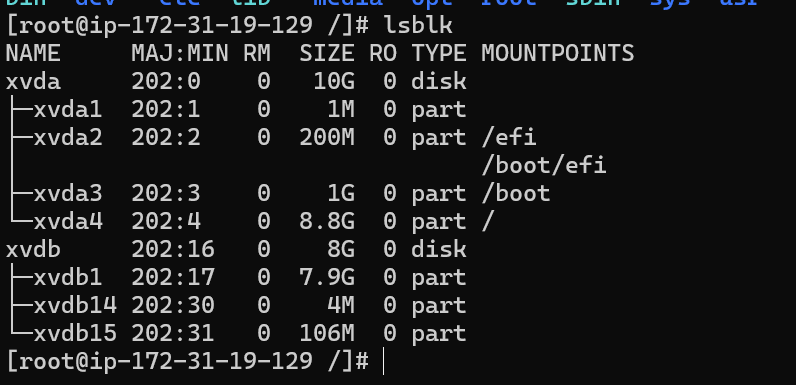
在/root/pwnedlabs/home/intern/practice_files目录下找到了一个s3_download_file.php
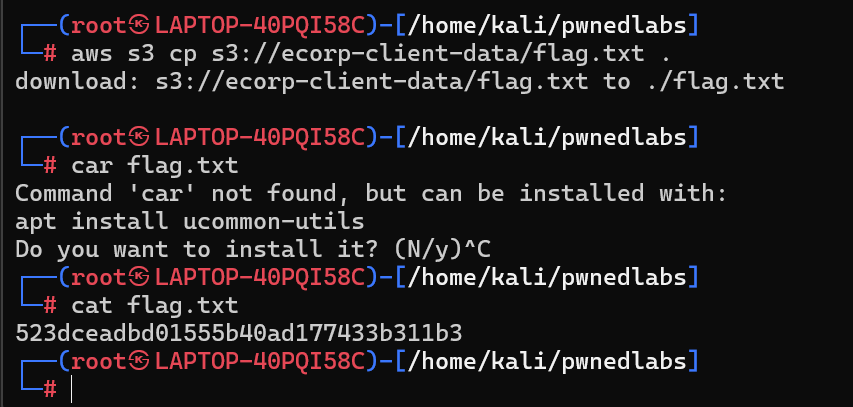
s3_download_file.php中包含了一个桶名称为ecorp-client-data的AK/SK
在aws cli配置好aksk之后,就可以访问存储桶了
Plunder Public RDS Snapshots
Scenario
Huge Logistics, a global logistics leader, has enlisted your team’s expertise for an external security review of their cloud infrastructure. Starting with the provided AWS Account ID, your task is to uncover security flaws within their AWS environment and demonstrate the potential risks they pose. Every finding will bolster their defense against future threats.
靶机只给了一个AWS account ID

看到这个AWS account ID。经过前面两个靶场的经验。我去找了这个ID的EBS快照。但是没找到东西😂
看了wp才知道,这个靶场是利用了RDS快照
然后我就去找了AWS的快照类型
AWS几个主要的快照
1. Amazon EBS 快照(Elastic Block Store Snapshots)
EBS 快照用于 备份 Amazon EBS 卷,主要有以下类型:
- 手动快照(Manual Snapshots)
- 由用户手动创建的 EBS 卷备份。
- 自动快照(Automated Snapshots)
- 由 AWS Backup 或生命周期策略(Lifecycle Policies)自动创建。
- 增量快照(Incremental Snapshots)
- AWS 只存储自上次快照以来更改的数据,以节省存储成本。
- 共享快照(Shared Snapshots)
- 你可以与 其他 AWS 账户 共享快照,但加密的快照必须使用相同的 KMS 密钥。
- 公共快照(Public Snapshots)
- 任何 AWS 账户都可以访问的快照。
2. Amazon RDS 快照(Relational Database Service Snapshots)
RDS 快照用于 备份 AWS RDS 数据库,主要包括:
- 手动 RDS 快照(Manual DB Snapshots)
- 由用户手动创建的数据库备份,可以保留无限时间。
- 自动 RDS 快照(Automated DB Snapshots)
- 由 AWS 维护,并根据保留策略自动删除。
- 共享 RDS 快照(Shared DB Snapshots)
- 允许你共享数据库快照给其他 AWS 账户。
- 公共 RDS 快照(Public DB Snapshots)
- 任何 AWS 账户都可以访问的数据库快照。
- 跨区域复制 RDS 快照(Cross-Region DB Snapshots)
- 允许你将快照复制到其他 AWS 区域,以提高容灾能力。
3. Amazon Aurora 快照(Aurora Snapshots)
Aurora 数据库集群也支持快照,与 RDS 类似,包含:
- 手动 Aurora 快照(Manual Aurora Snapshots)
- 自动 Aurora 快照(Automated Aurora Snapshots)
- 共享 Aurora 快照(Shared Aurora Snapshots)
- 公共 Aurora 快照(Public Aurora Snapshots)
- 跨区域复制 Aurora 快照(Cross-Region Aurora Snapshots)
4. Amazon Redshift 快照
Redshift 是 AWS 的 数据仓库,它的快照类型包括:
- 手动快照(Manual Snapshots)
- 自动快照(Automated Snapshots)
- 共享快照(Shared Snapshots)
- 跨区域复制快照(Cross-Region Snapshots)
5. Amazon FSx 快照
Amazon FSx 主要用于 托管文件系统,支持以下快照:
- FSx for Windows File Server Snapshots
- FSx for Lustre Snapshots
6. Amazon Backup 管理的快照
AWS Backup 提供 集中化的备份管理,支持:
- EBS 卷快照
- RDS/Aurora 数据库快照
- DynamoDB 备份
- EFS 备份
- FSx 备份
- Storage Gateway 备份
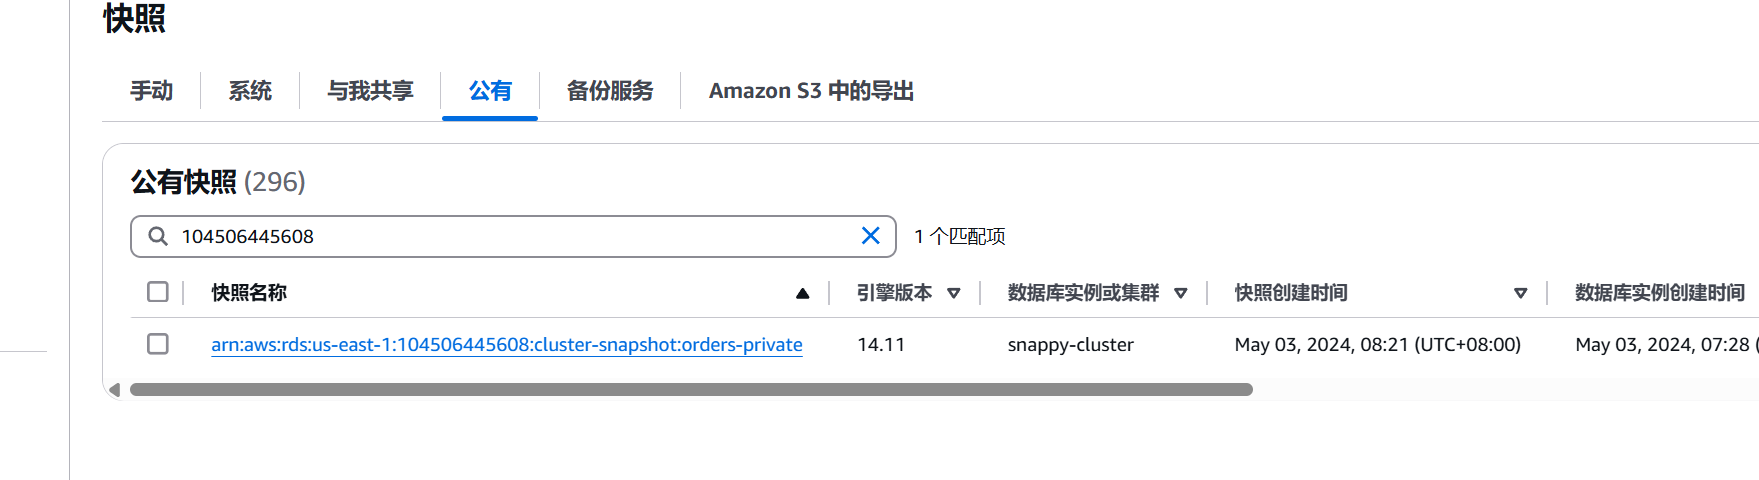
这个AWS account ID 下面有一个RDS的公共快照
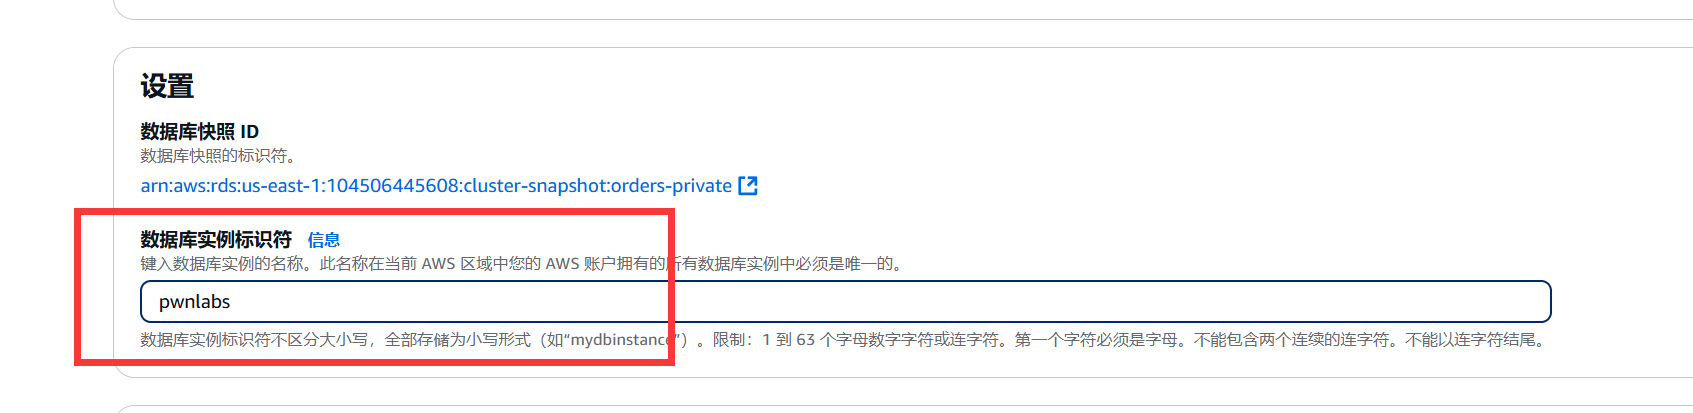
还原快照
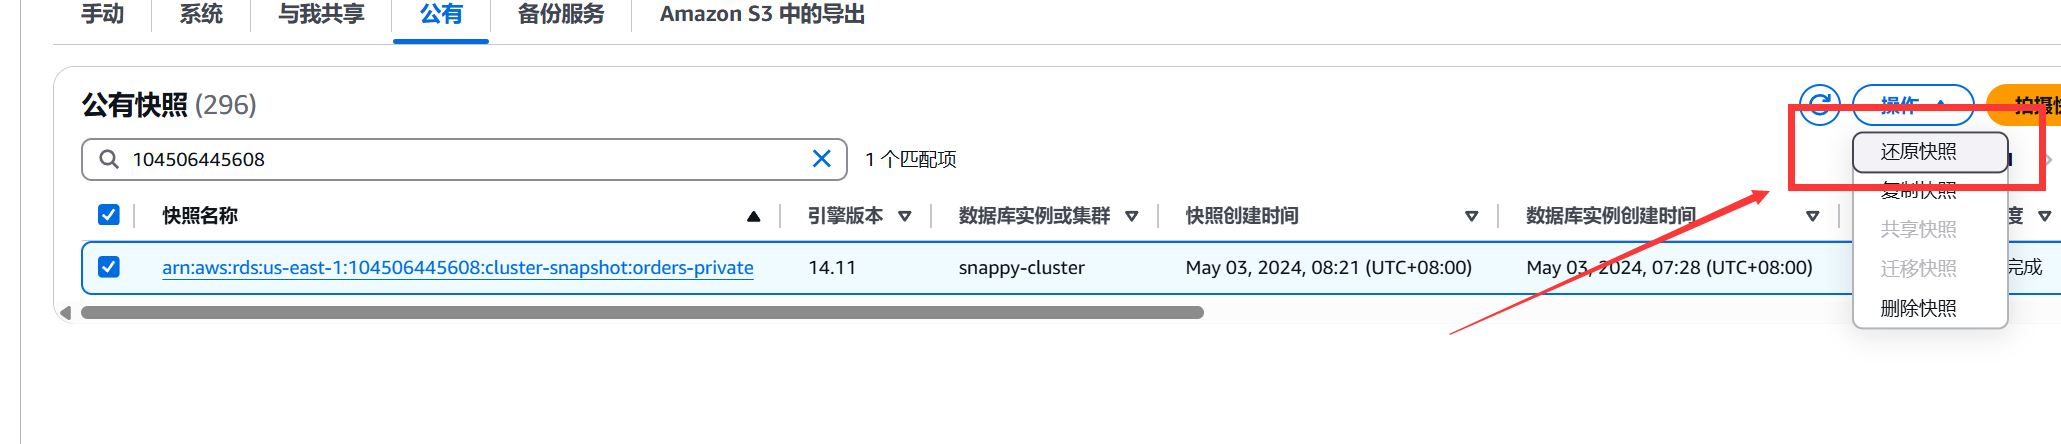
随便起一个名称
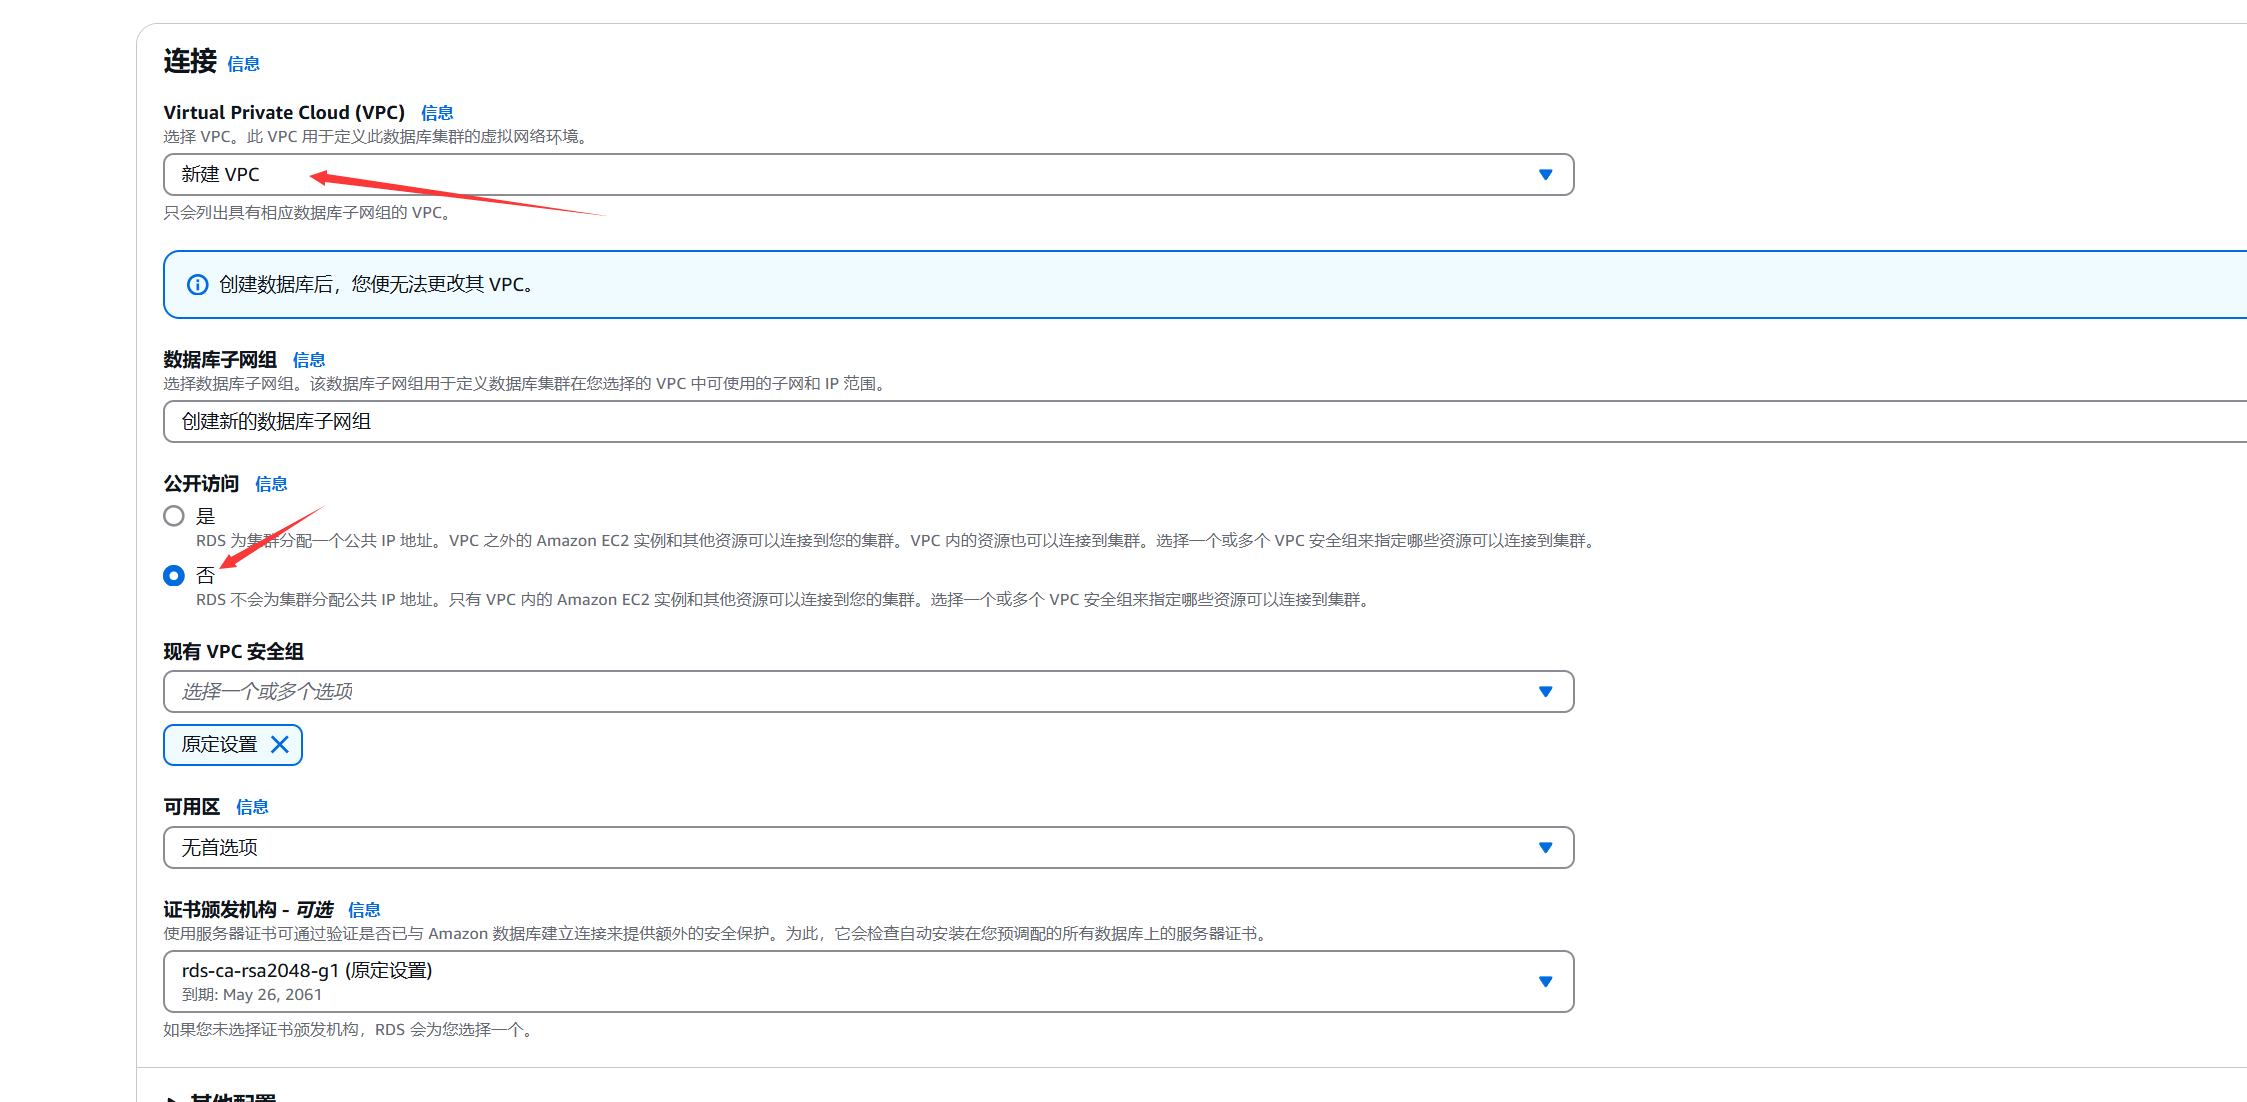
新建一个VPC,然后设置公开访问
然后换源快照,时间可能稍长一些
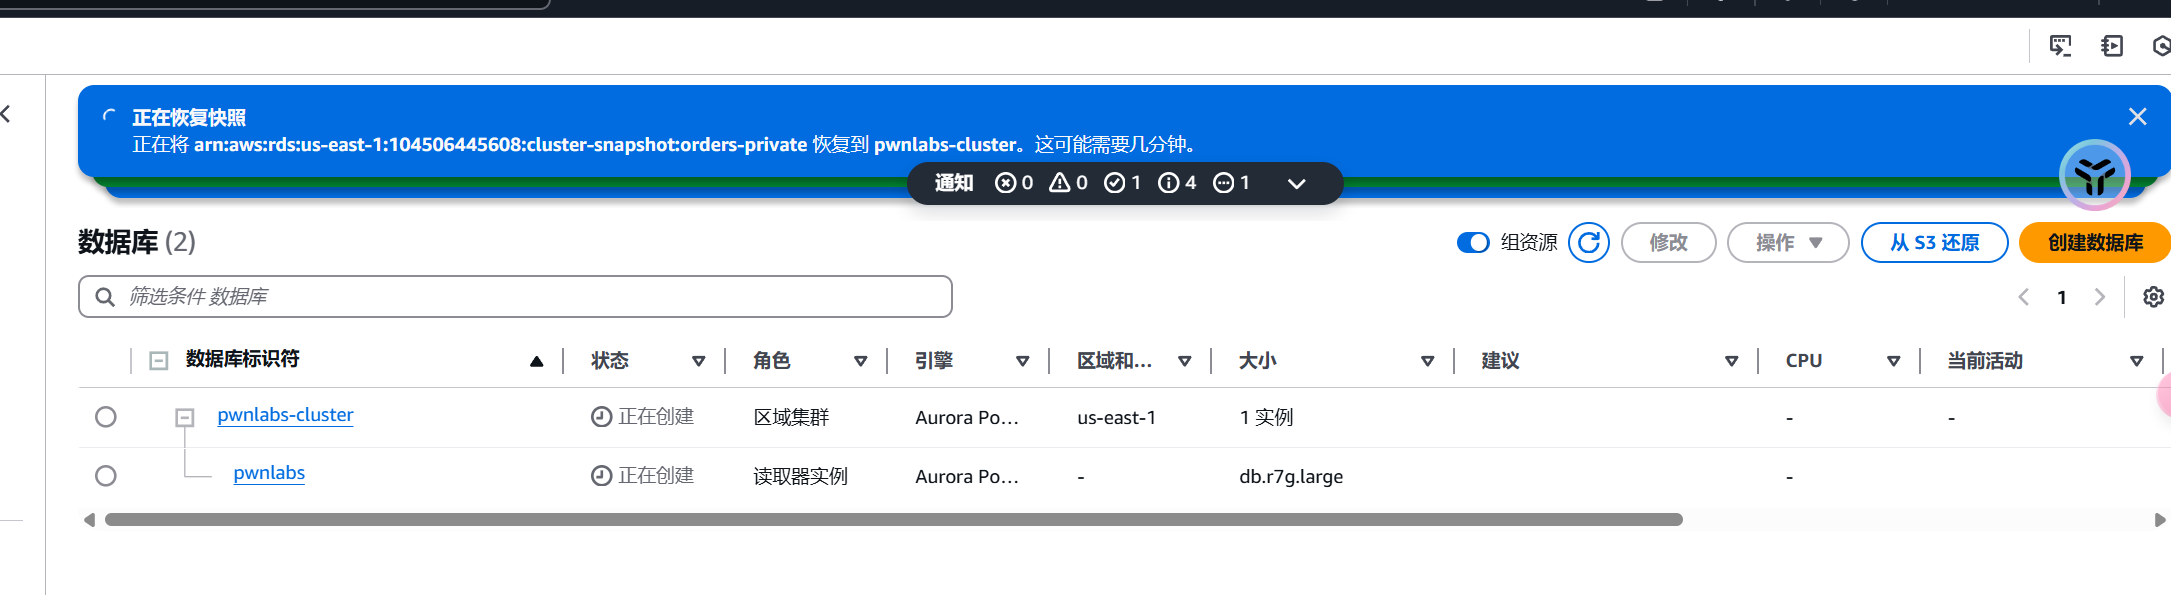
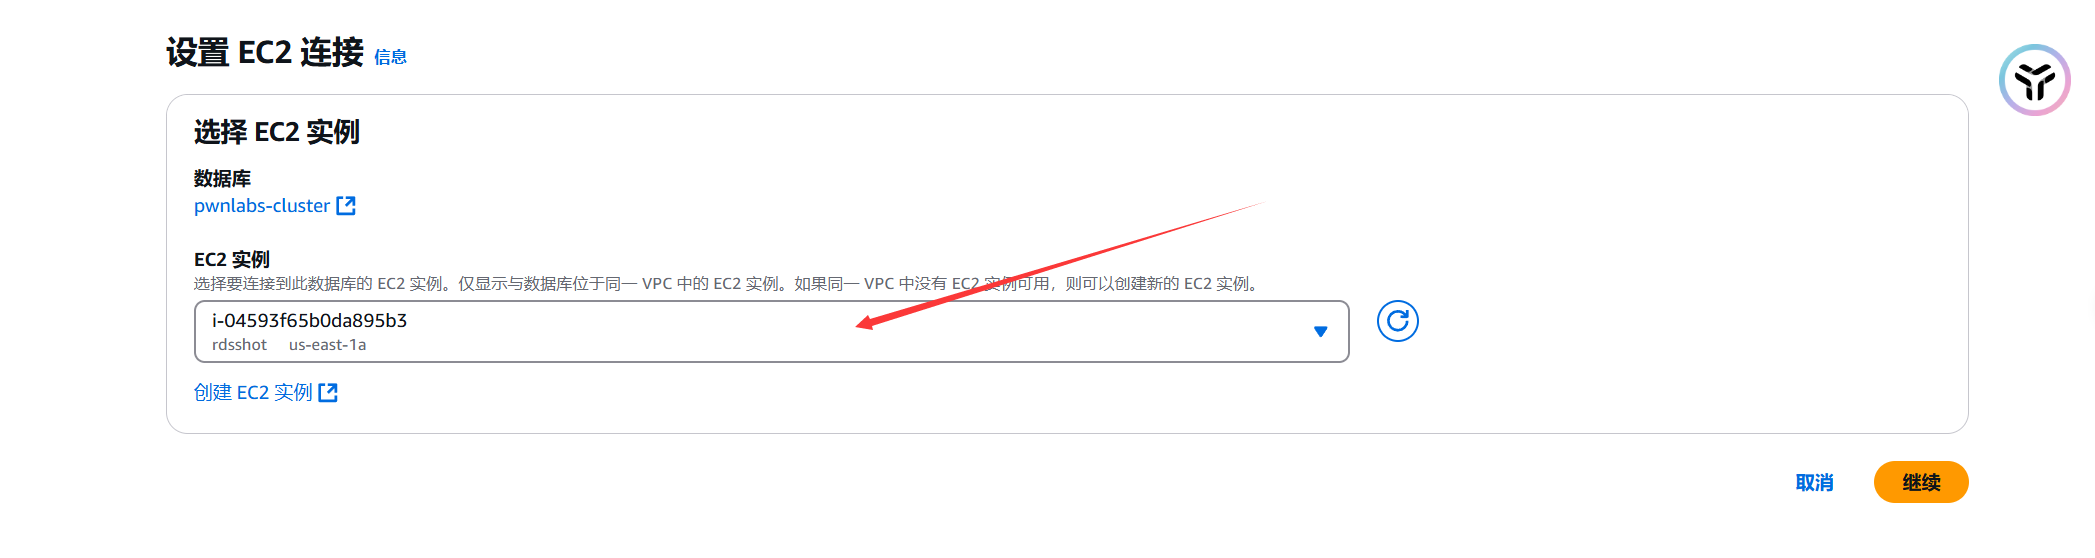
设置EC2连接
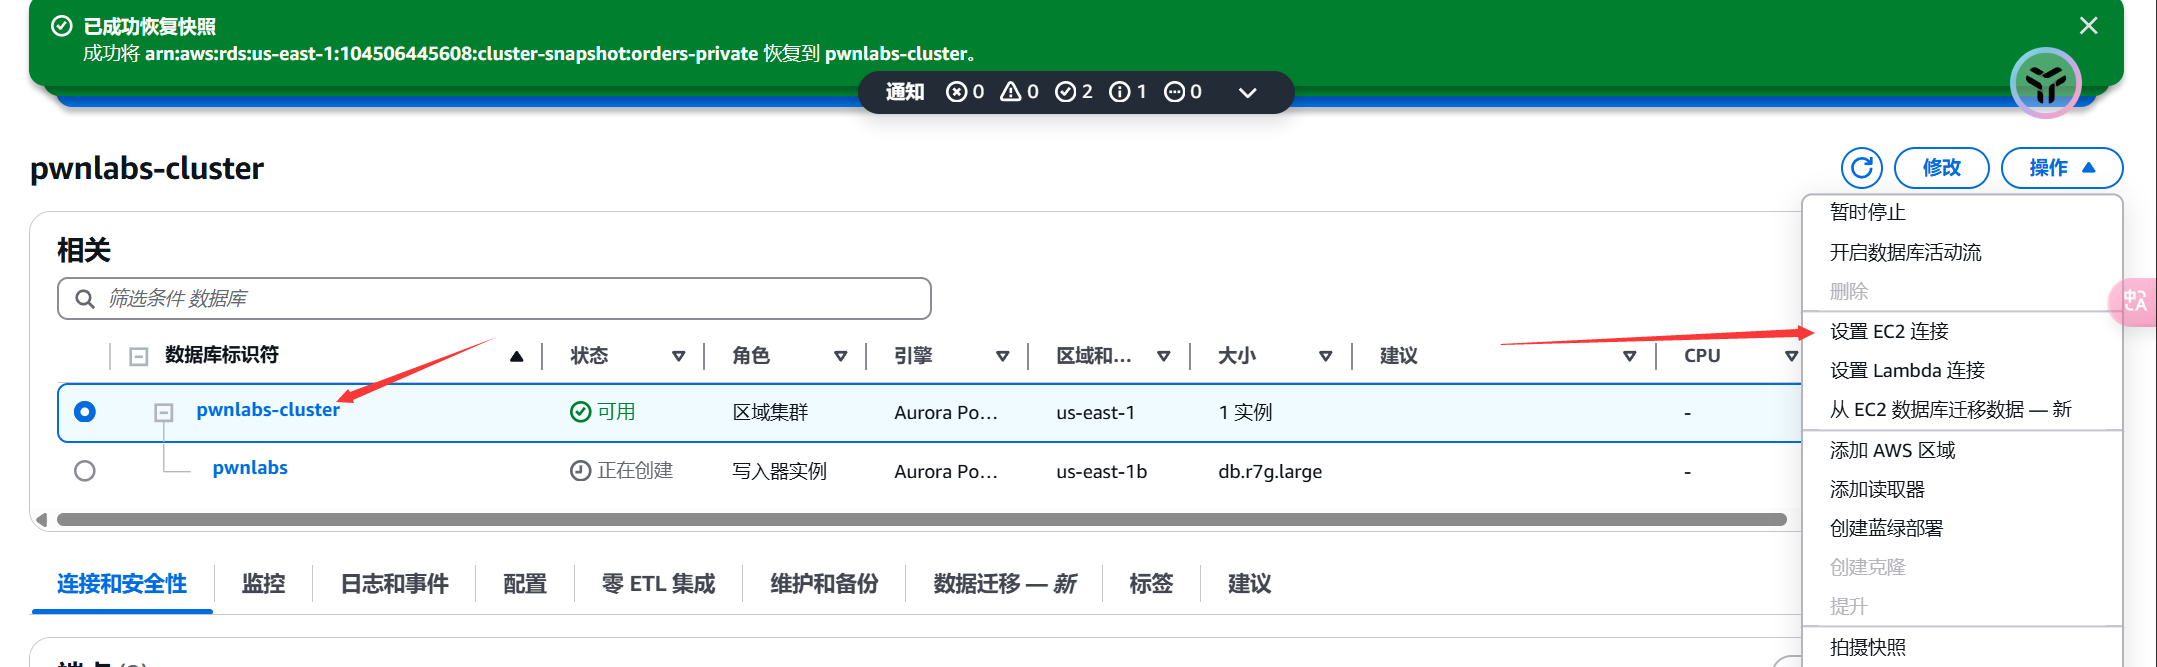
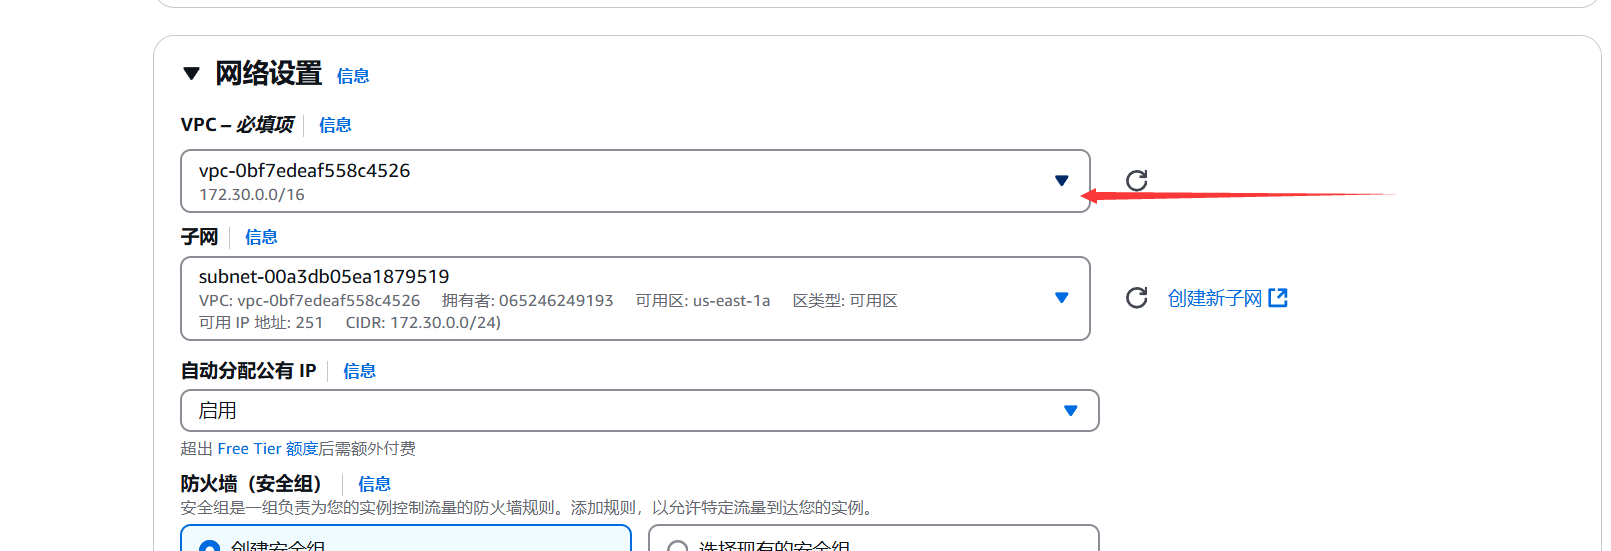
创建一个EC2
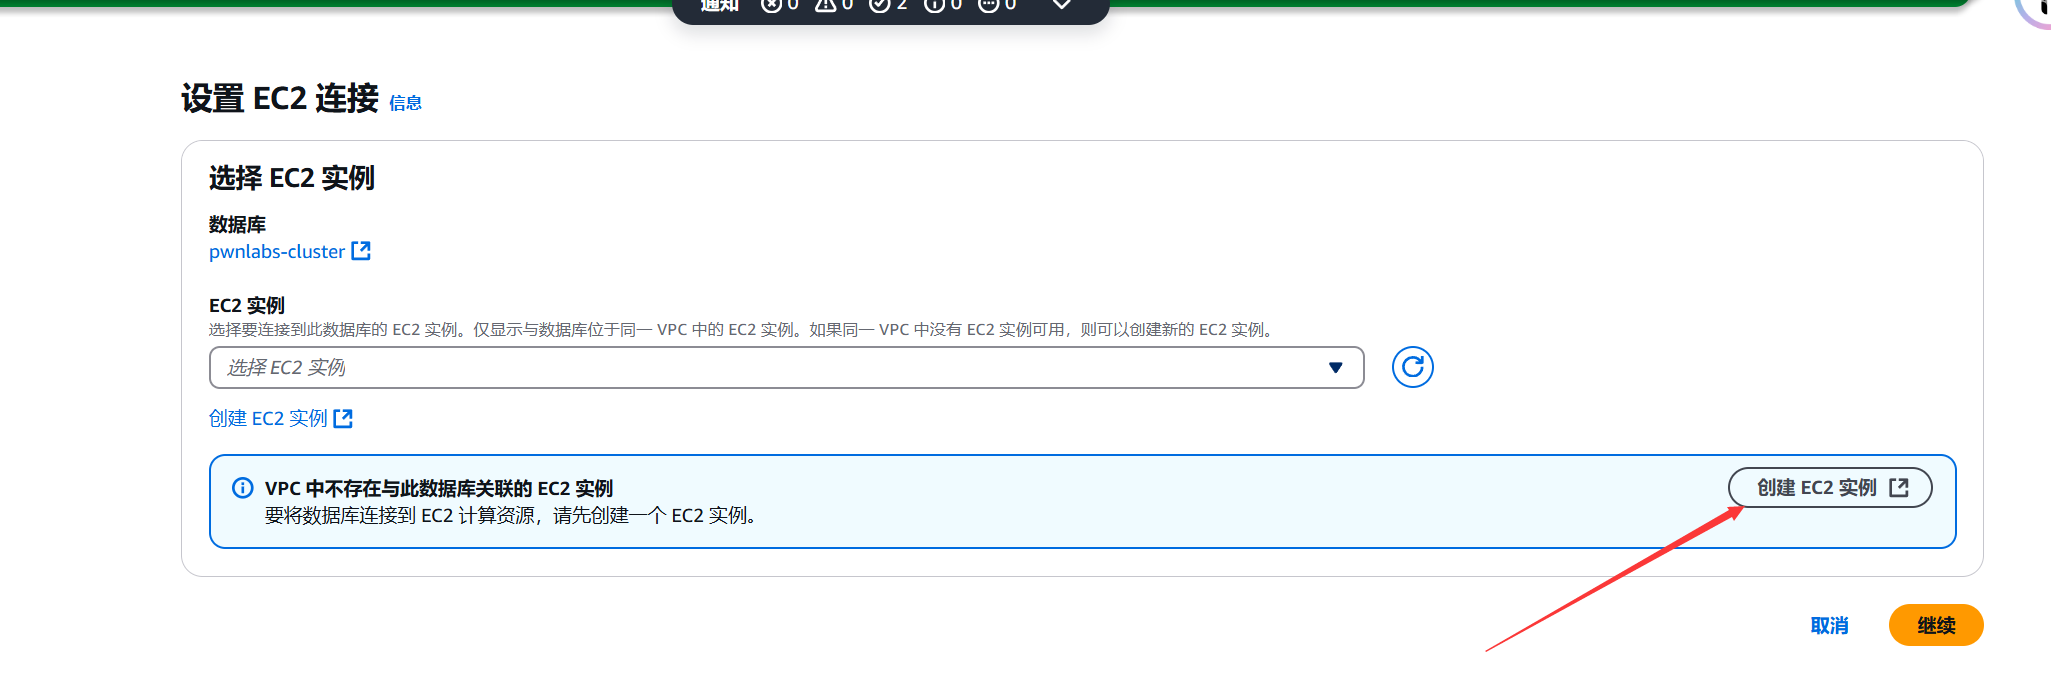
这里的VPC要与数据库在同一个VPC一样
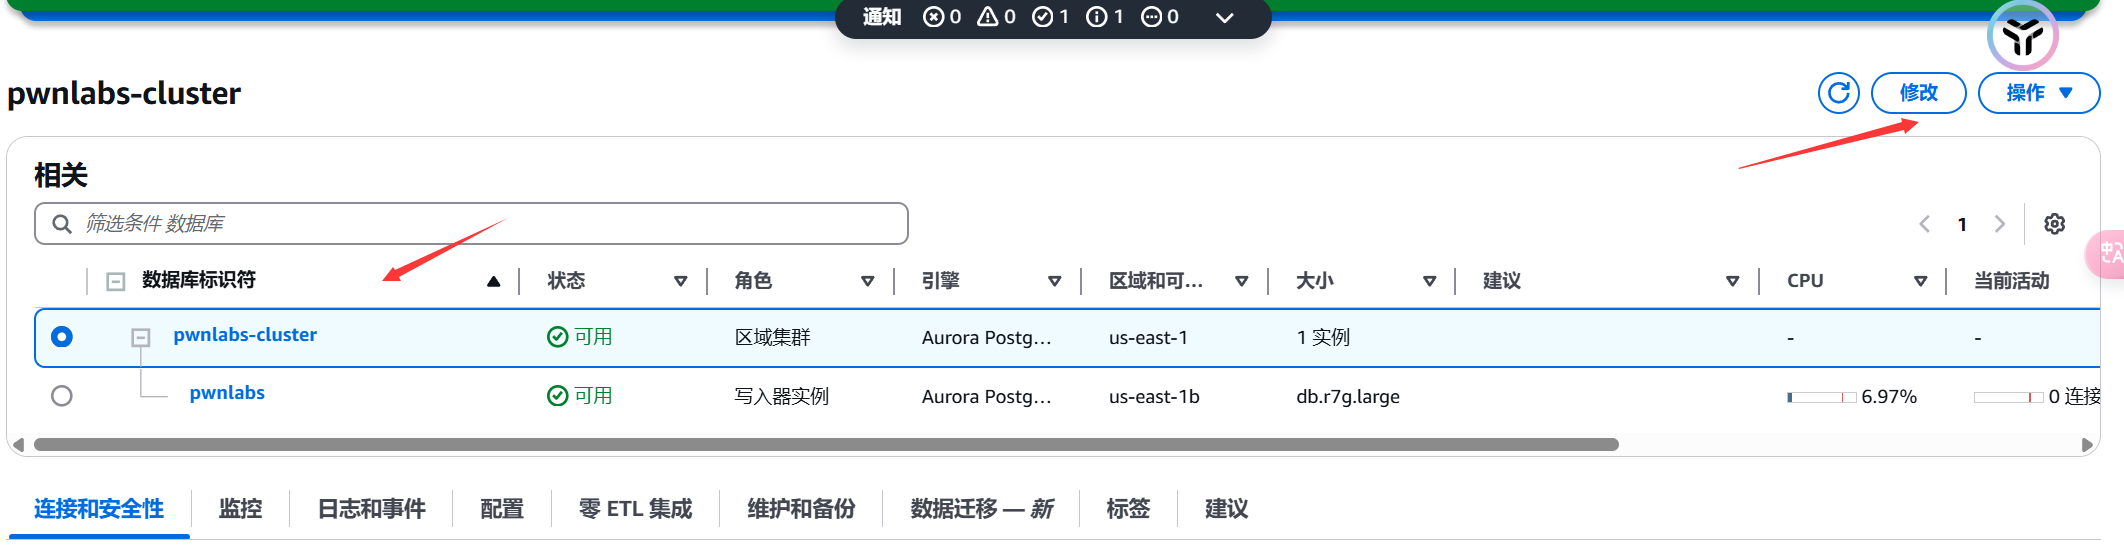
然后就可以将数据库连接到EC2上面了
然后修改数据库密码
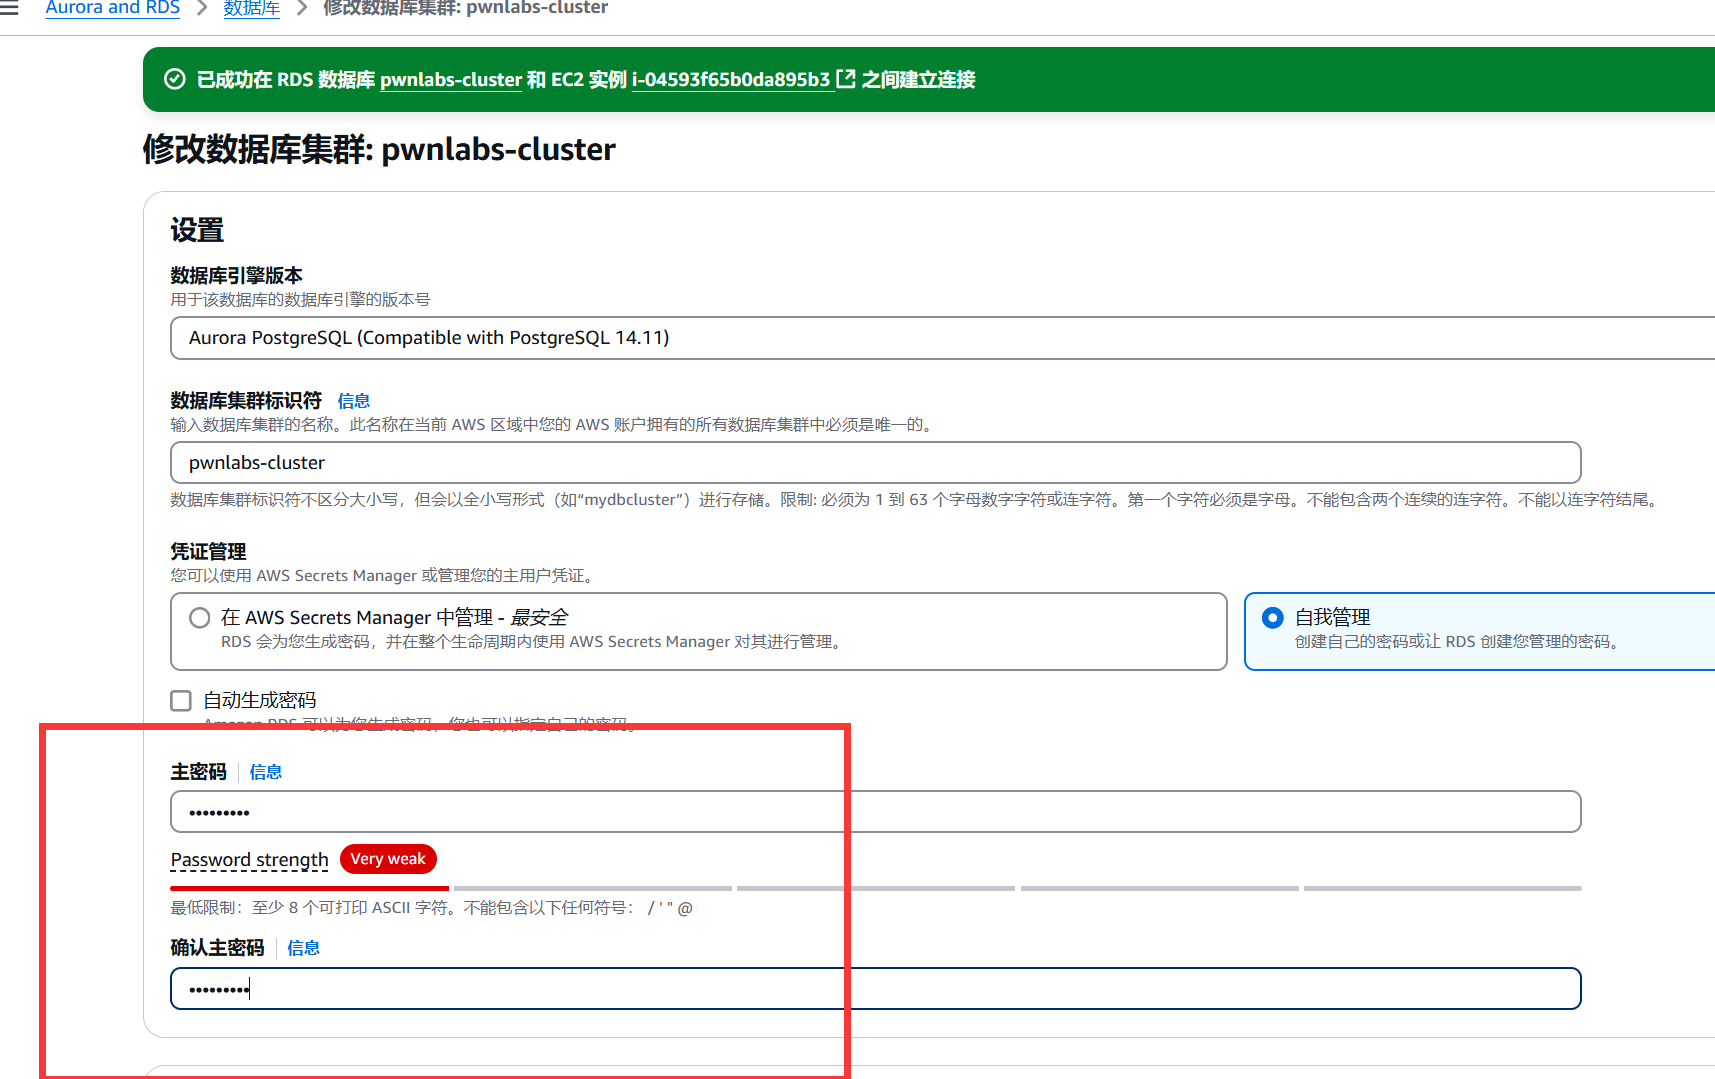
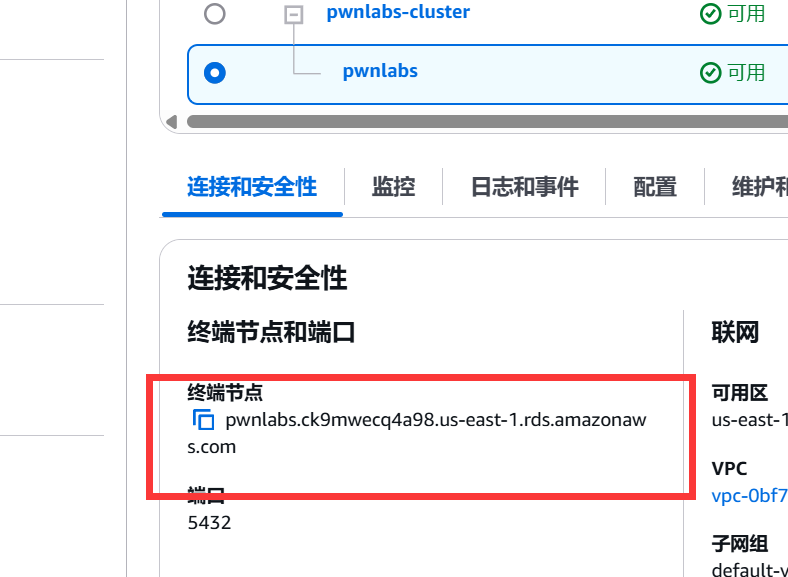
使用psql -h <endpoint> -U postgres连接到数据库
<endpoint>替换为
EC2上面没有psql使用apt install -y postgresql-client命令安装一个

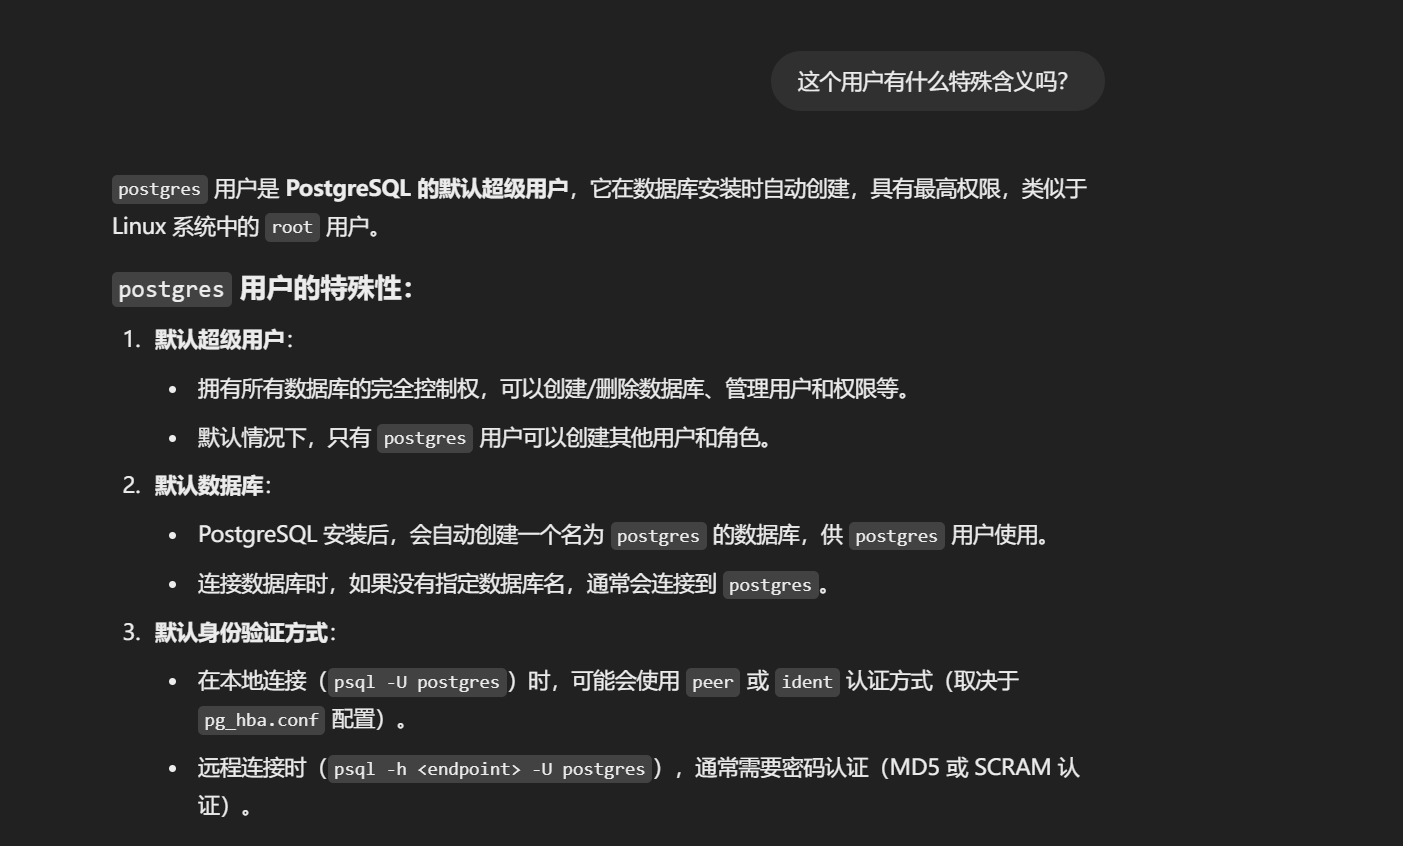
因为是第一次见到这个数据库,这里我刚开始没明白为什么要使用
postgres这个用户去连接数据库昨晚这个靶场之后我问了一下GPT GPT是这样回答的
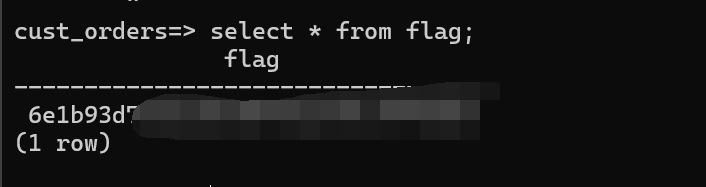
使用\l列出数据库

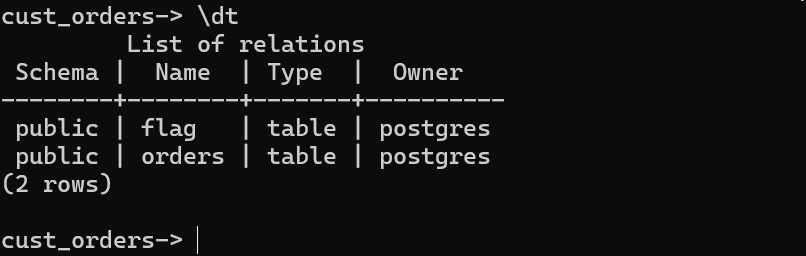
使用\c 数据库名来使用数据库

使用\dt列出数据表
 wechat
- alipay